Appearance
MCP (Model Context Protocol)
MCP is an open standard developed by Anthropic that enables AI models to interact with external tools and services through a standardized interface. In Workflow Automation, MCP serves as a bridge between your automations and external AI assistants such as Claude, ChatGPT, or custom AI agents.
With MCP, you can turn any Workflow Automation workflow into an AI-callable function - no coding required. Your AI assistant can trigger actions, retrieve data, and execute complex multi-step automations simply by asking.
Workflow Automation's MCP integration enables all MCP-capable AI clients to directly use all integrated apps and simple and complex flows from the chat UI of the AI client.
Further information
Read more about the Model Context Protocol at modelcontextprotocol.io.
Key Features of Workflow Automation's MCP:
- AI Integration: Connect Claude Desktop, ChatGPT, or any MCP-compatible AI client to your workflows
- App Tools: Expose individual actions from any Workflow Automation app (e.g., "Send SMS", "Create Record")
- Flow Tools: Turn complete multi-step workflows into single AI-callable functions
- Secure Authentication: Token-based authentication ensures only authorized AI clients can access your tools
- Execution Visibility: Track all AI-triggered executions in your Workflow Automation dashboard
- No Coding Required: Set up AI integrations entirely through the visual interface
- In a flow, MCP in Workflow Automation can serve as both a Trigger and an Action. See use case 2 below for details.
Trigger:
MCP Tool: Triggers a flow when called by an AI client through the MCP protocol. Allows you to define an input schema for structured data.
Action:
MCP Respond: Sends a structured response back to the AI client after flow execution
Two Ways to Use MCP in Workflow Automation
Workflow Automation supports two types of MCP tools:
| Type | Description | Use Case |
|---|---|---|
| App Tools | Direct actions from any connected app | Simple, single-step operations like sending an SMS or creating a record |
| Flow Tools | Complete flows with multiple steps | Complex operations combining data from multiple apps |
The following sections explain all MCP features in two example use cases. This way, it is easier to understand the configuration of an MCP-Server on Workflow Automation side, and the integration of the configured Server on the MCP-client side (we have used the Claude client in the examples).
The first example use case is sending an SMS via an MCP tool. This uses a simple action from the Workflow Automation connected apps catalogue (here CPaaS). It enables users to send an SMS via the Claude chat.
The second example use case configures an MCP-server that integrates a complex Workflow Automation flow. The flow receives a phone number from the chat client, looks it up in Salesforce, and, if the number exists, returns the name of the person associated with that number. The SMS will use the name to personalize the message.
Use Case 1: Connected App Tool (Send SMS via AI chat)
This example shows how to expose a single action - sending an SMS via Telekom CPaaS - as an MCP tool that your AI assistant can call directly to execute the action.
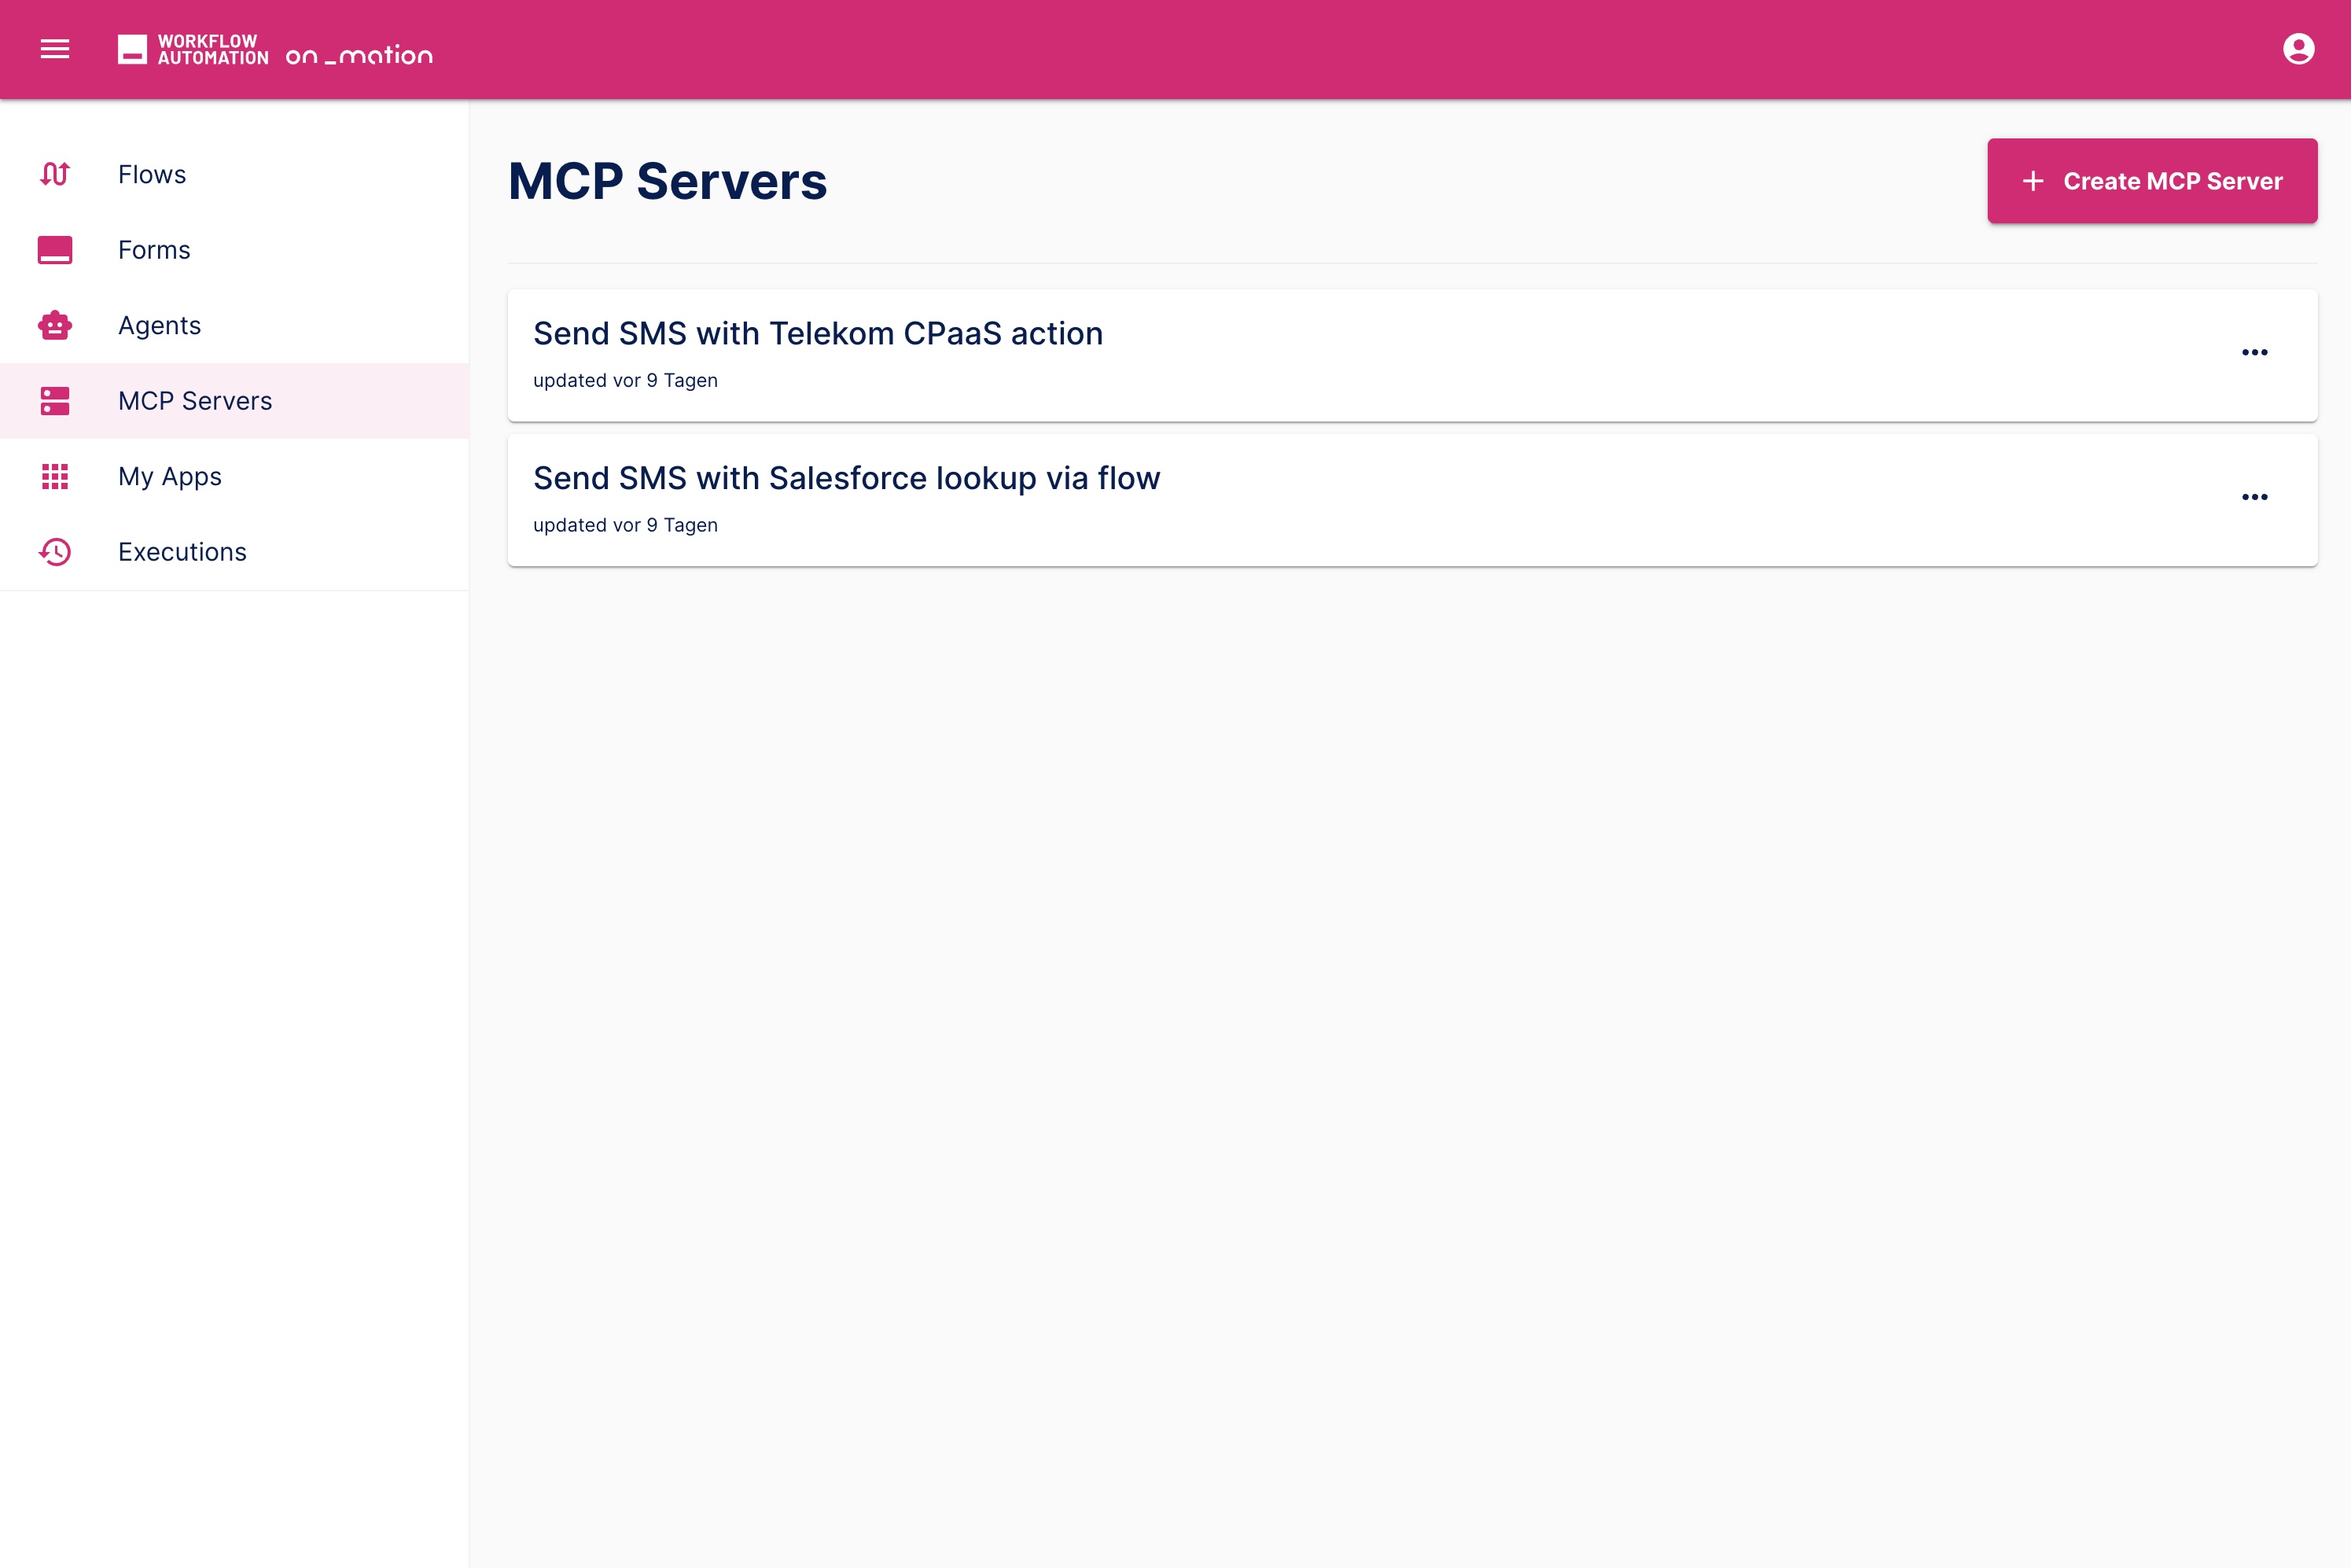
Step 1: Create, name and configure an MCP Server
In Workflow Automation, navigate to the MCP section in the sidebar and click Create MCP Server. Do not forget to name your MCP-server with a self-explanatory title.
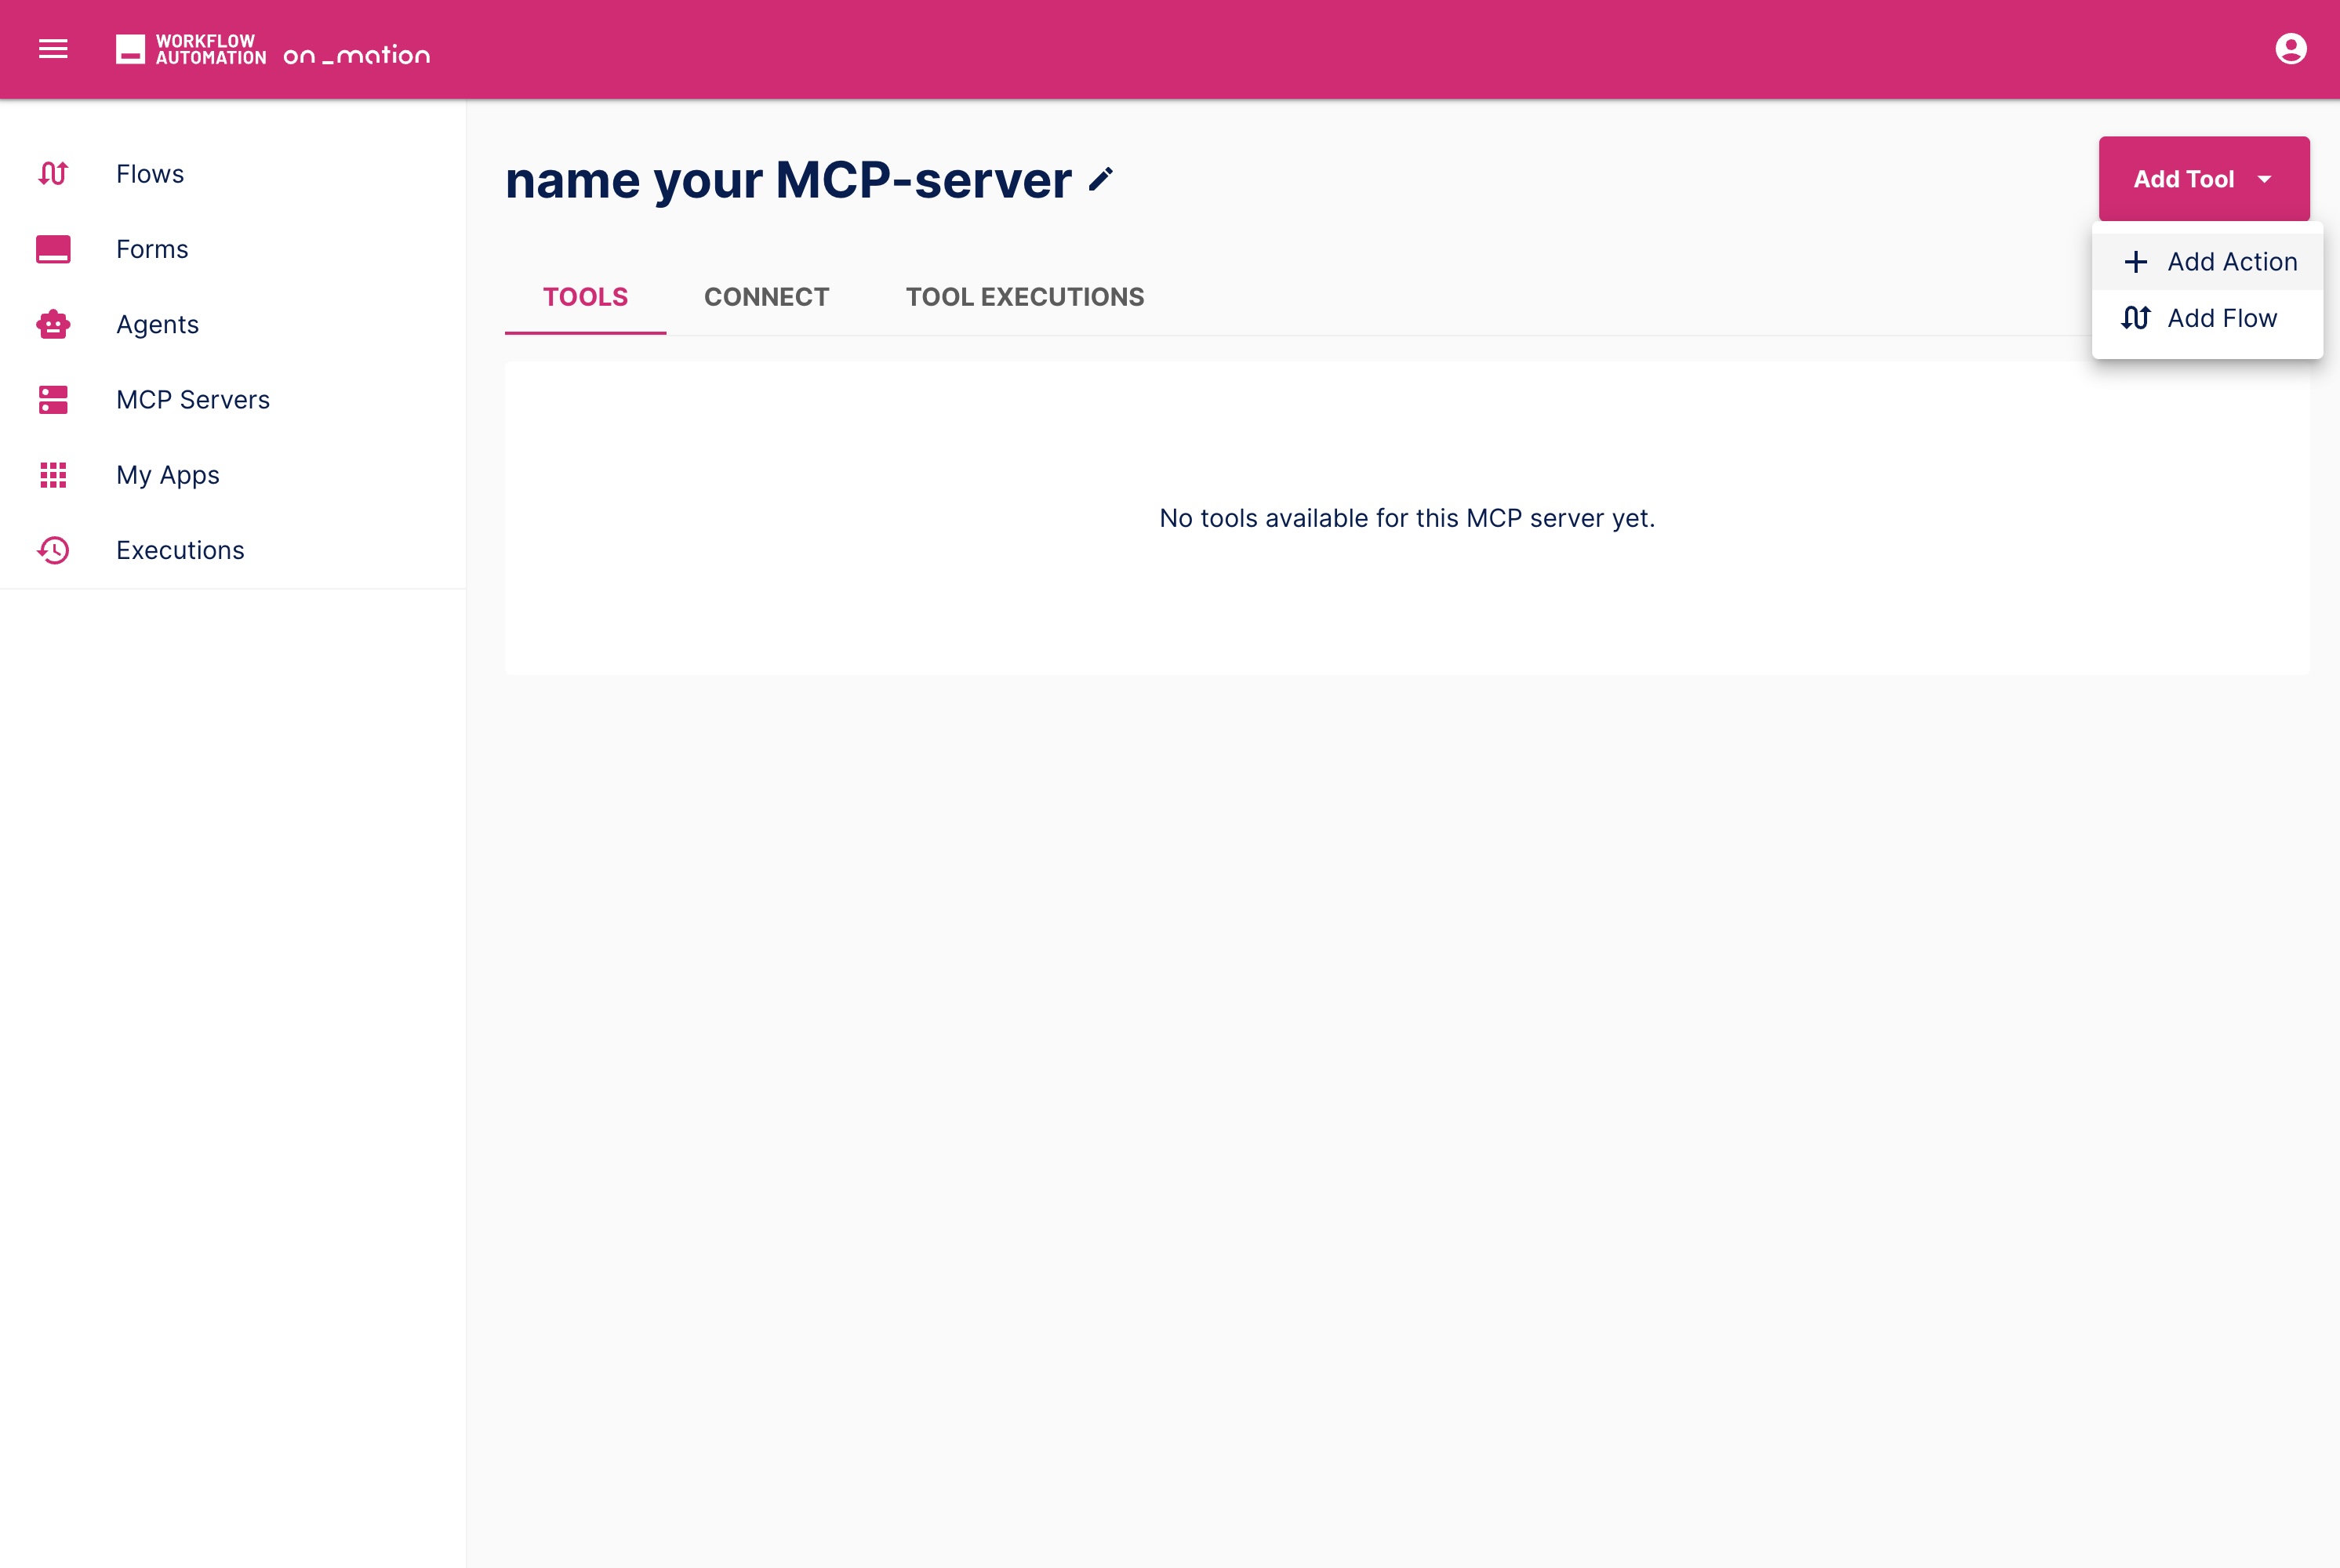
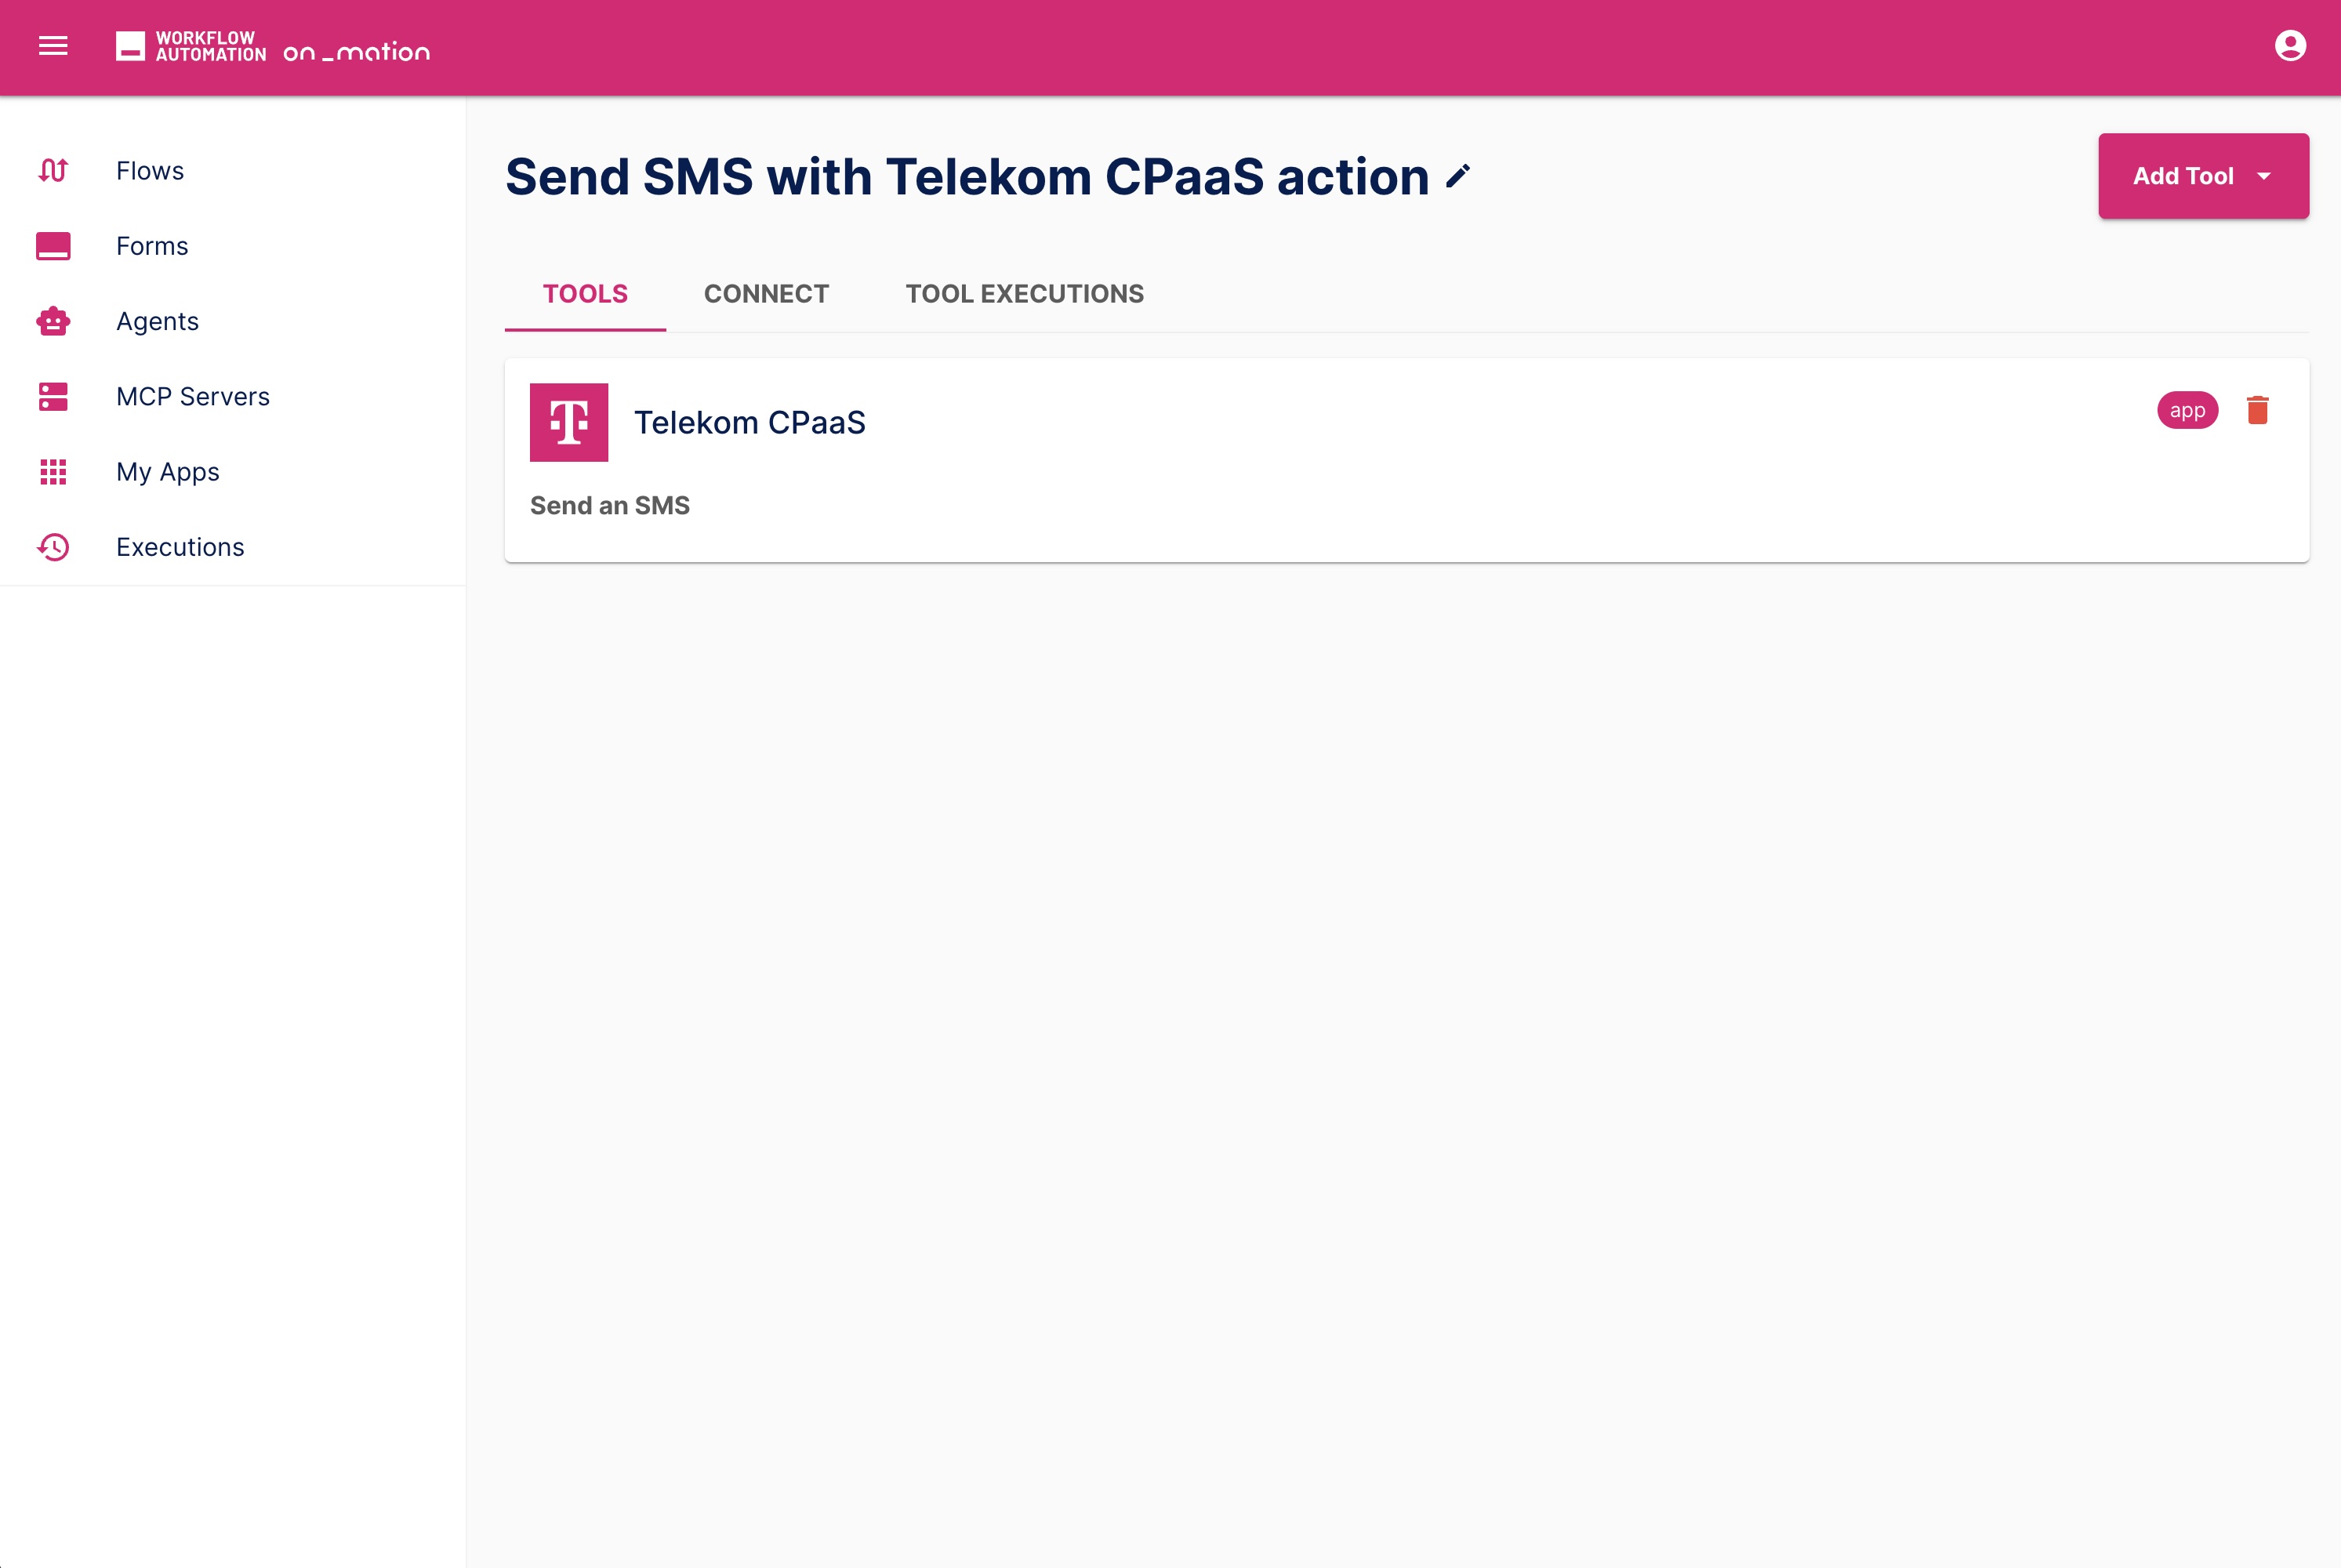
Click Add Tool and choose Add Action to configure a connected app as the MCP feature.
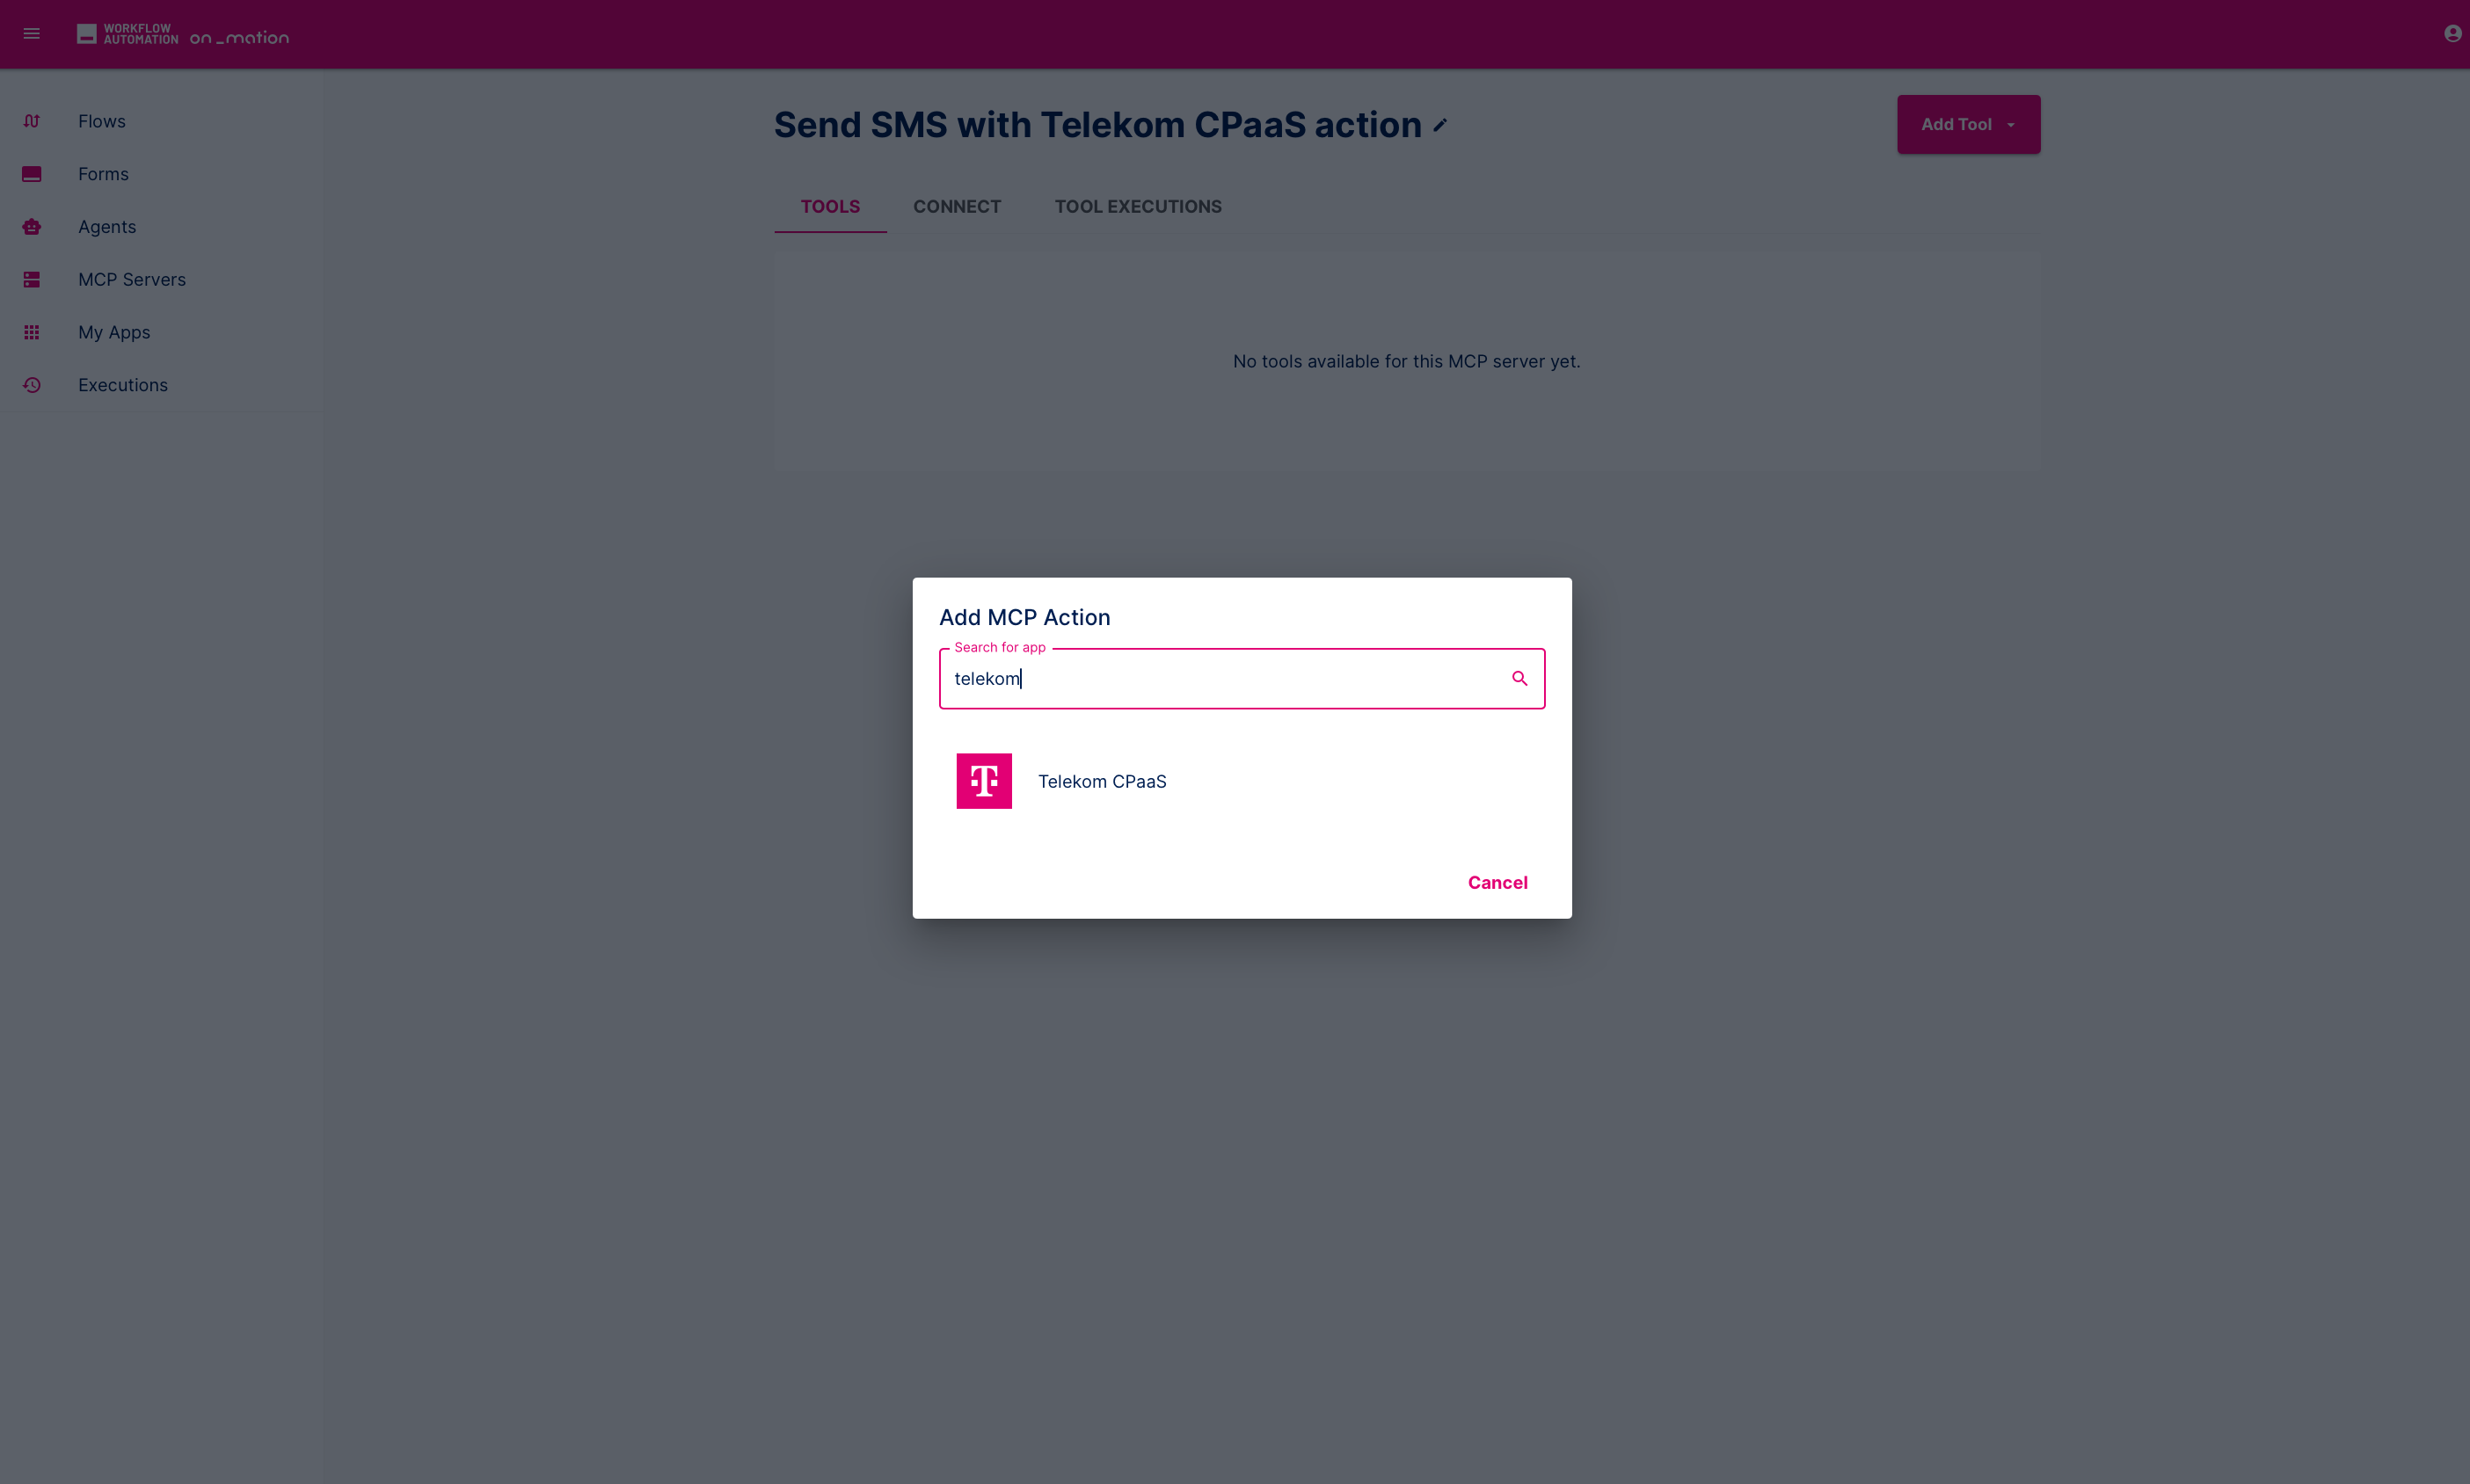
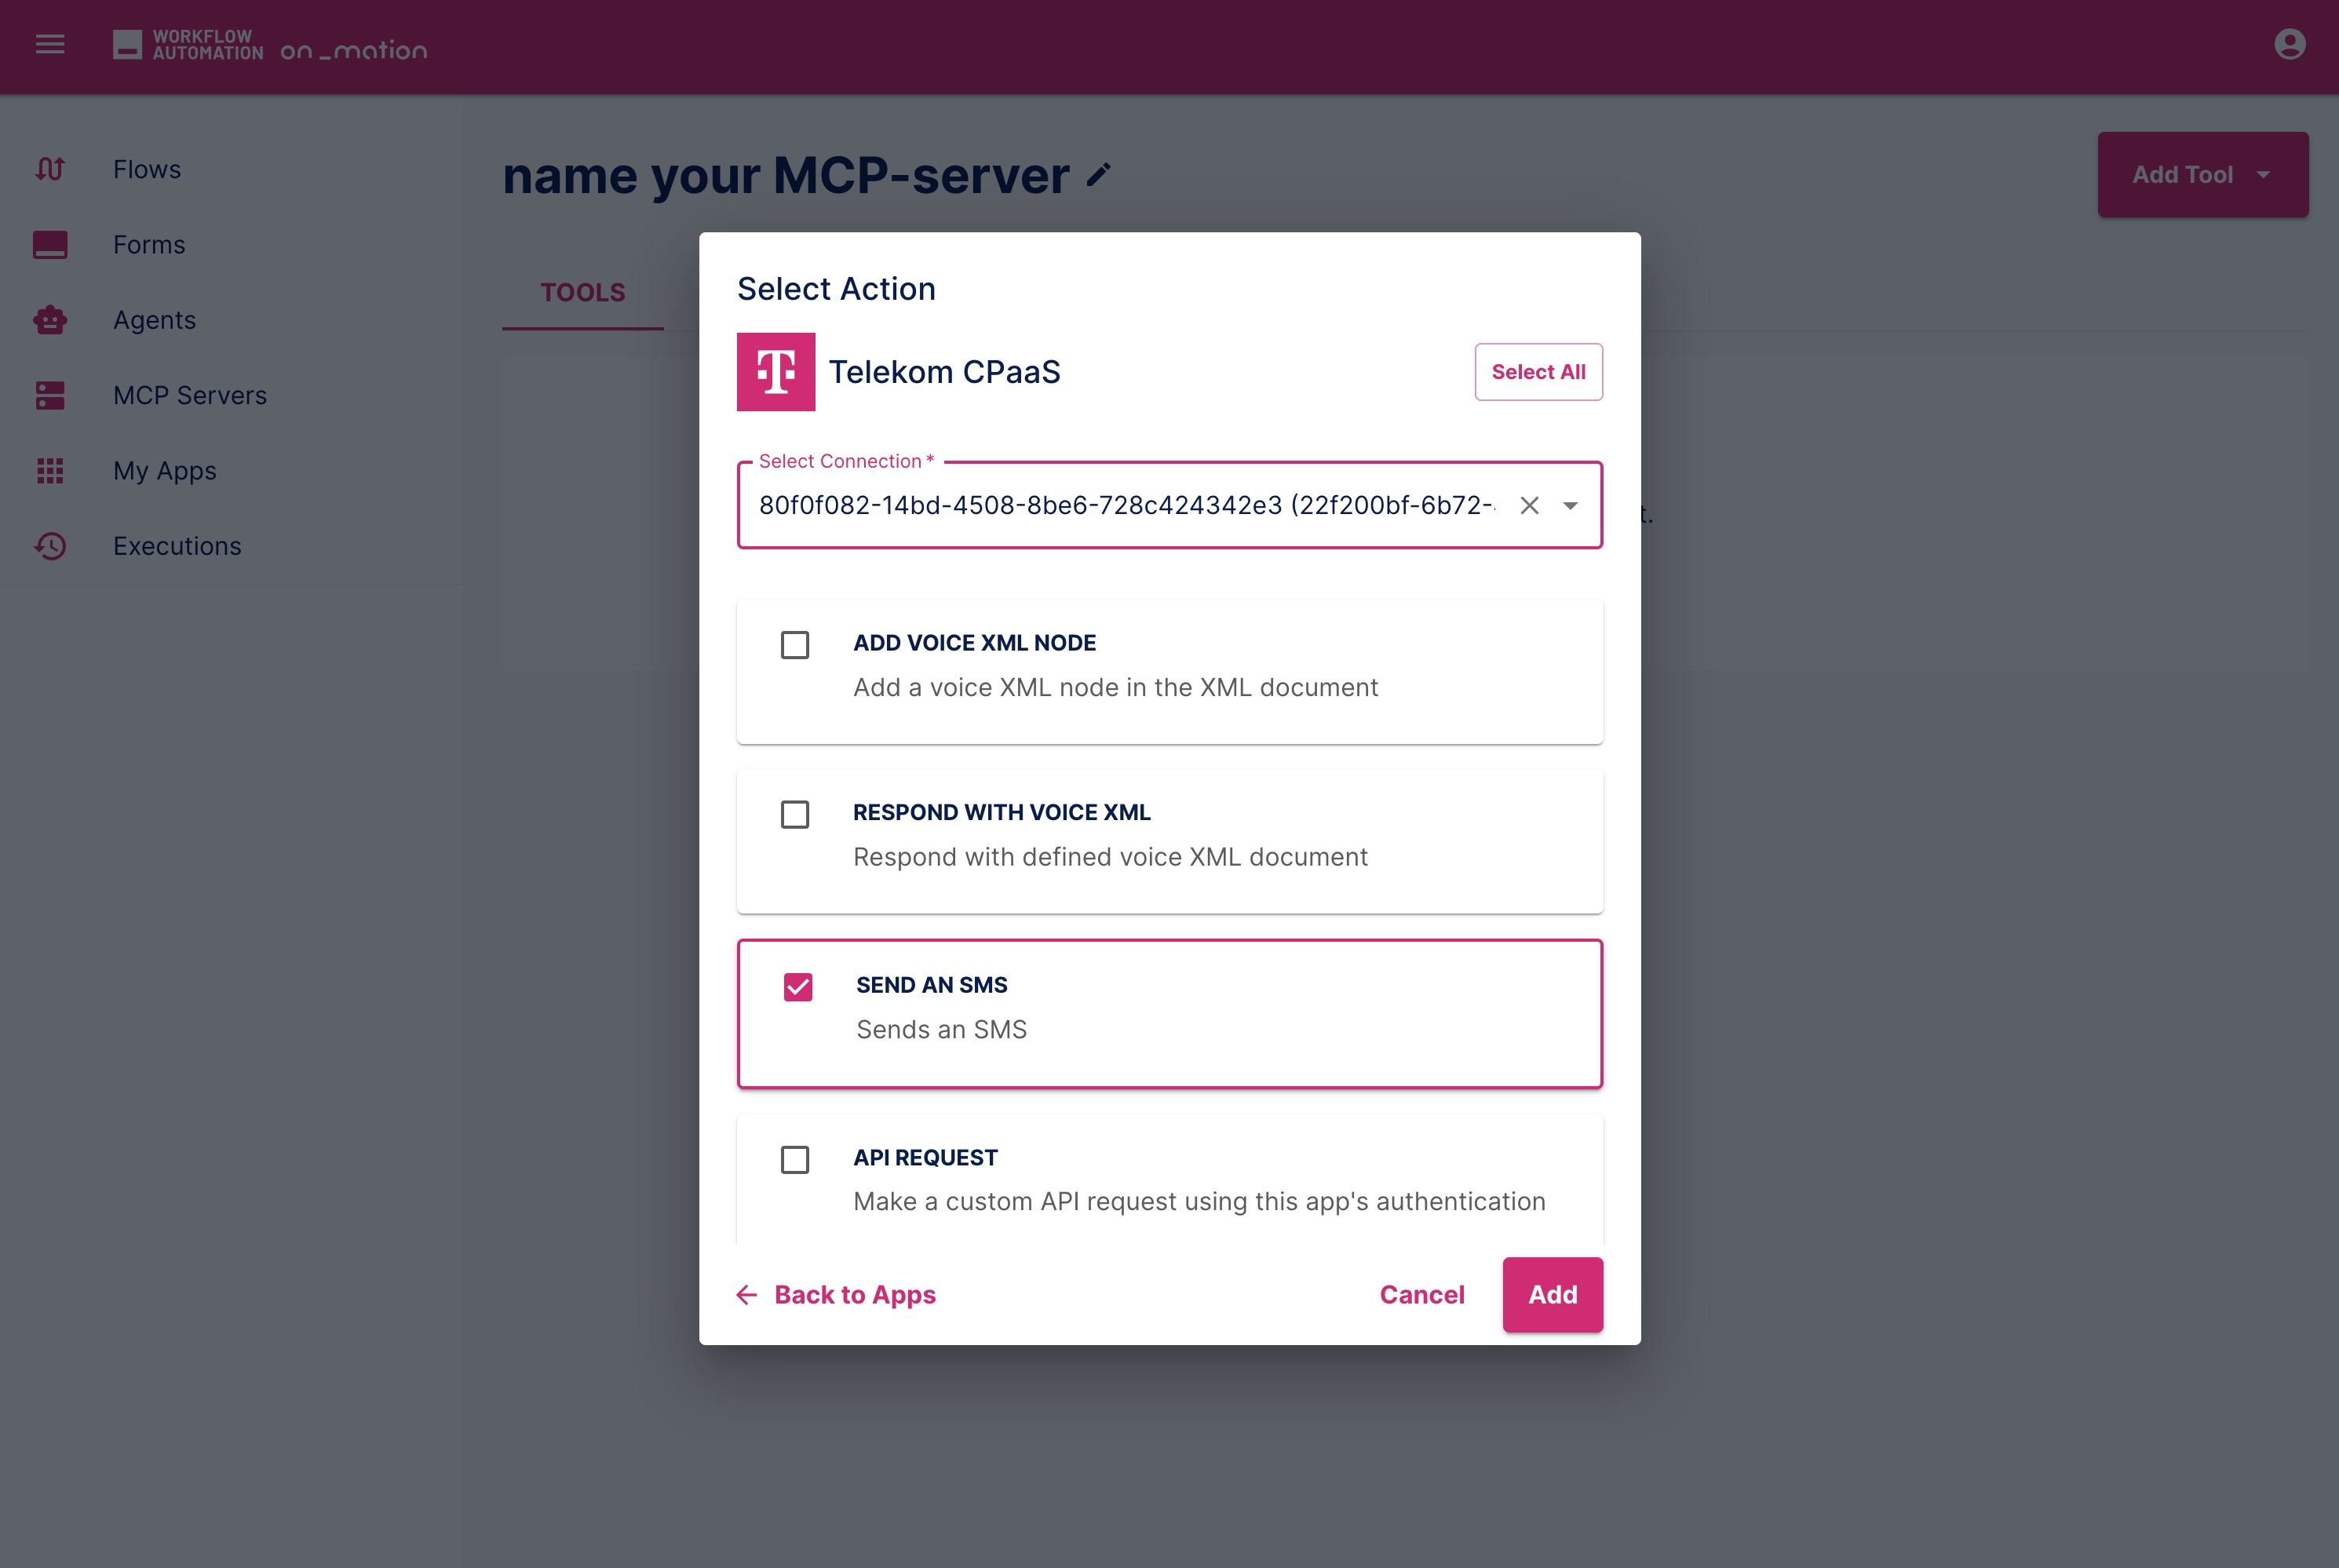
Choose Telekom CPaaS (it serves as the example) as the app and select Send an SMS as the action (dynamic list from the chosen app). Select your pre-configured connection of the app. Add your tool to the MCP server.
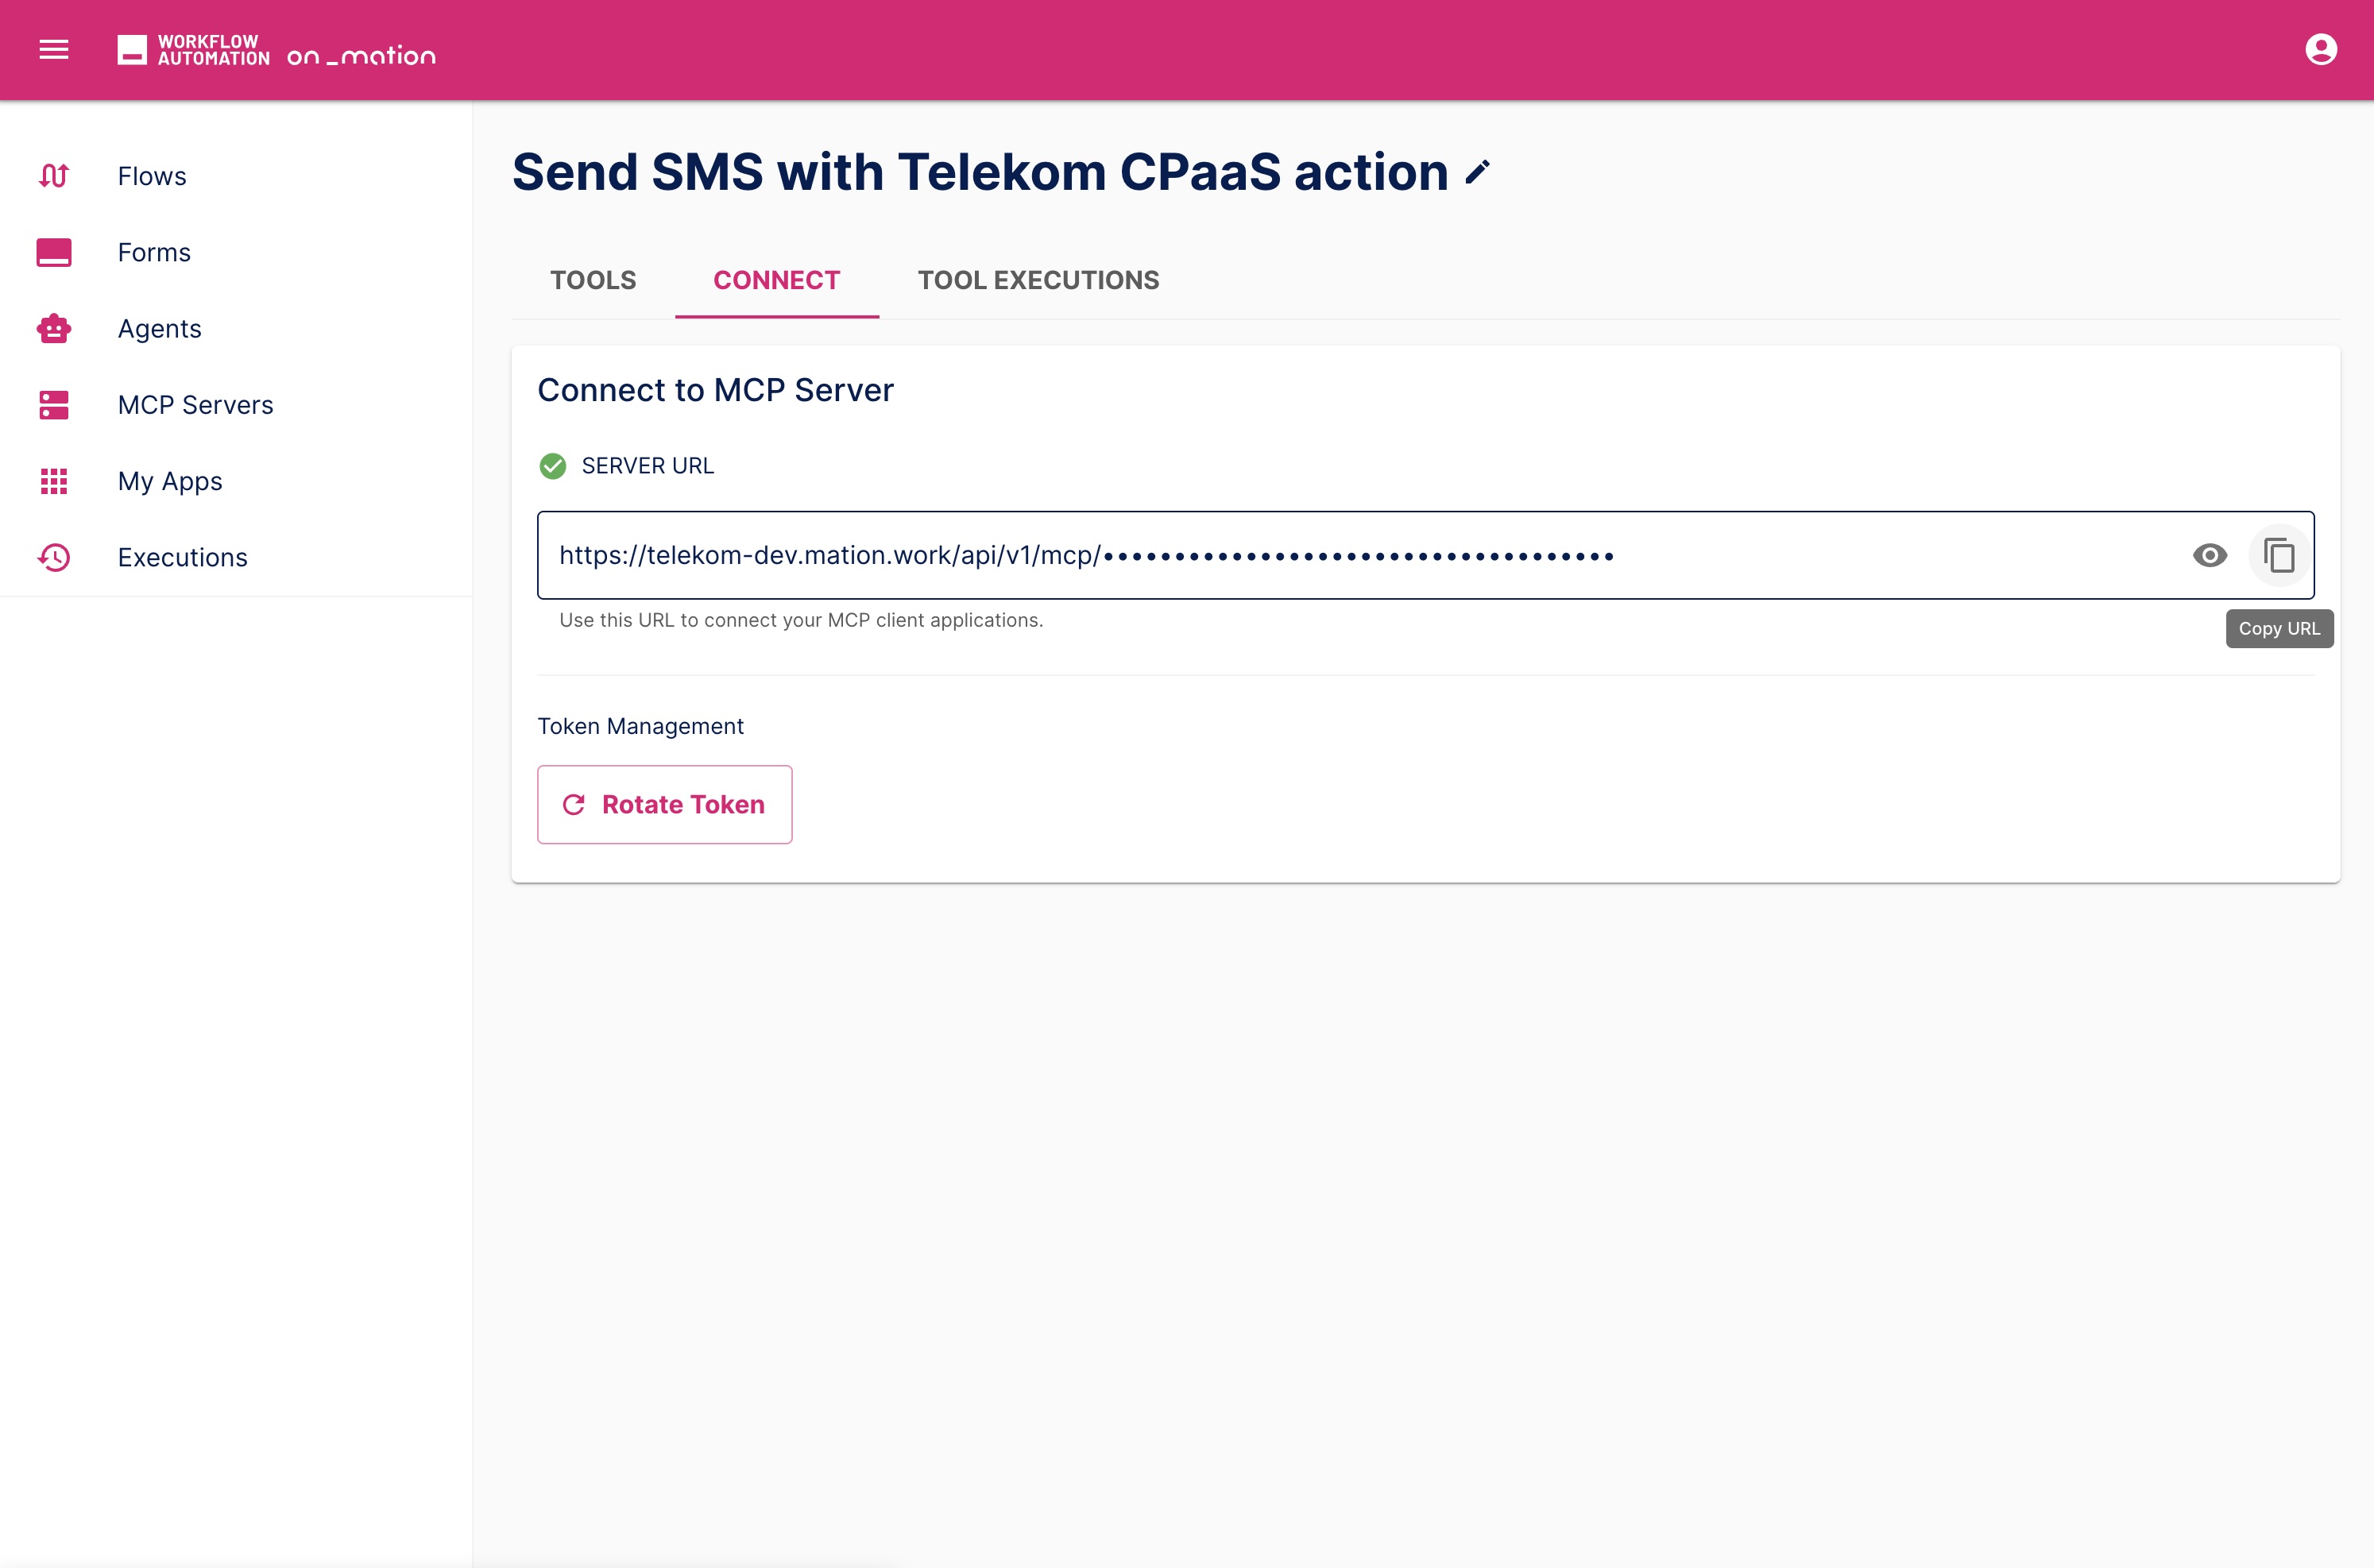
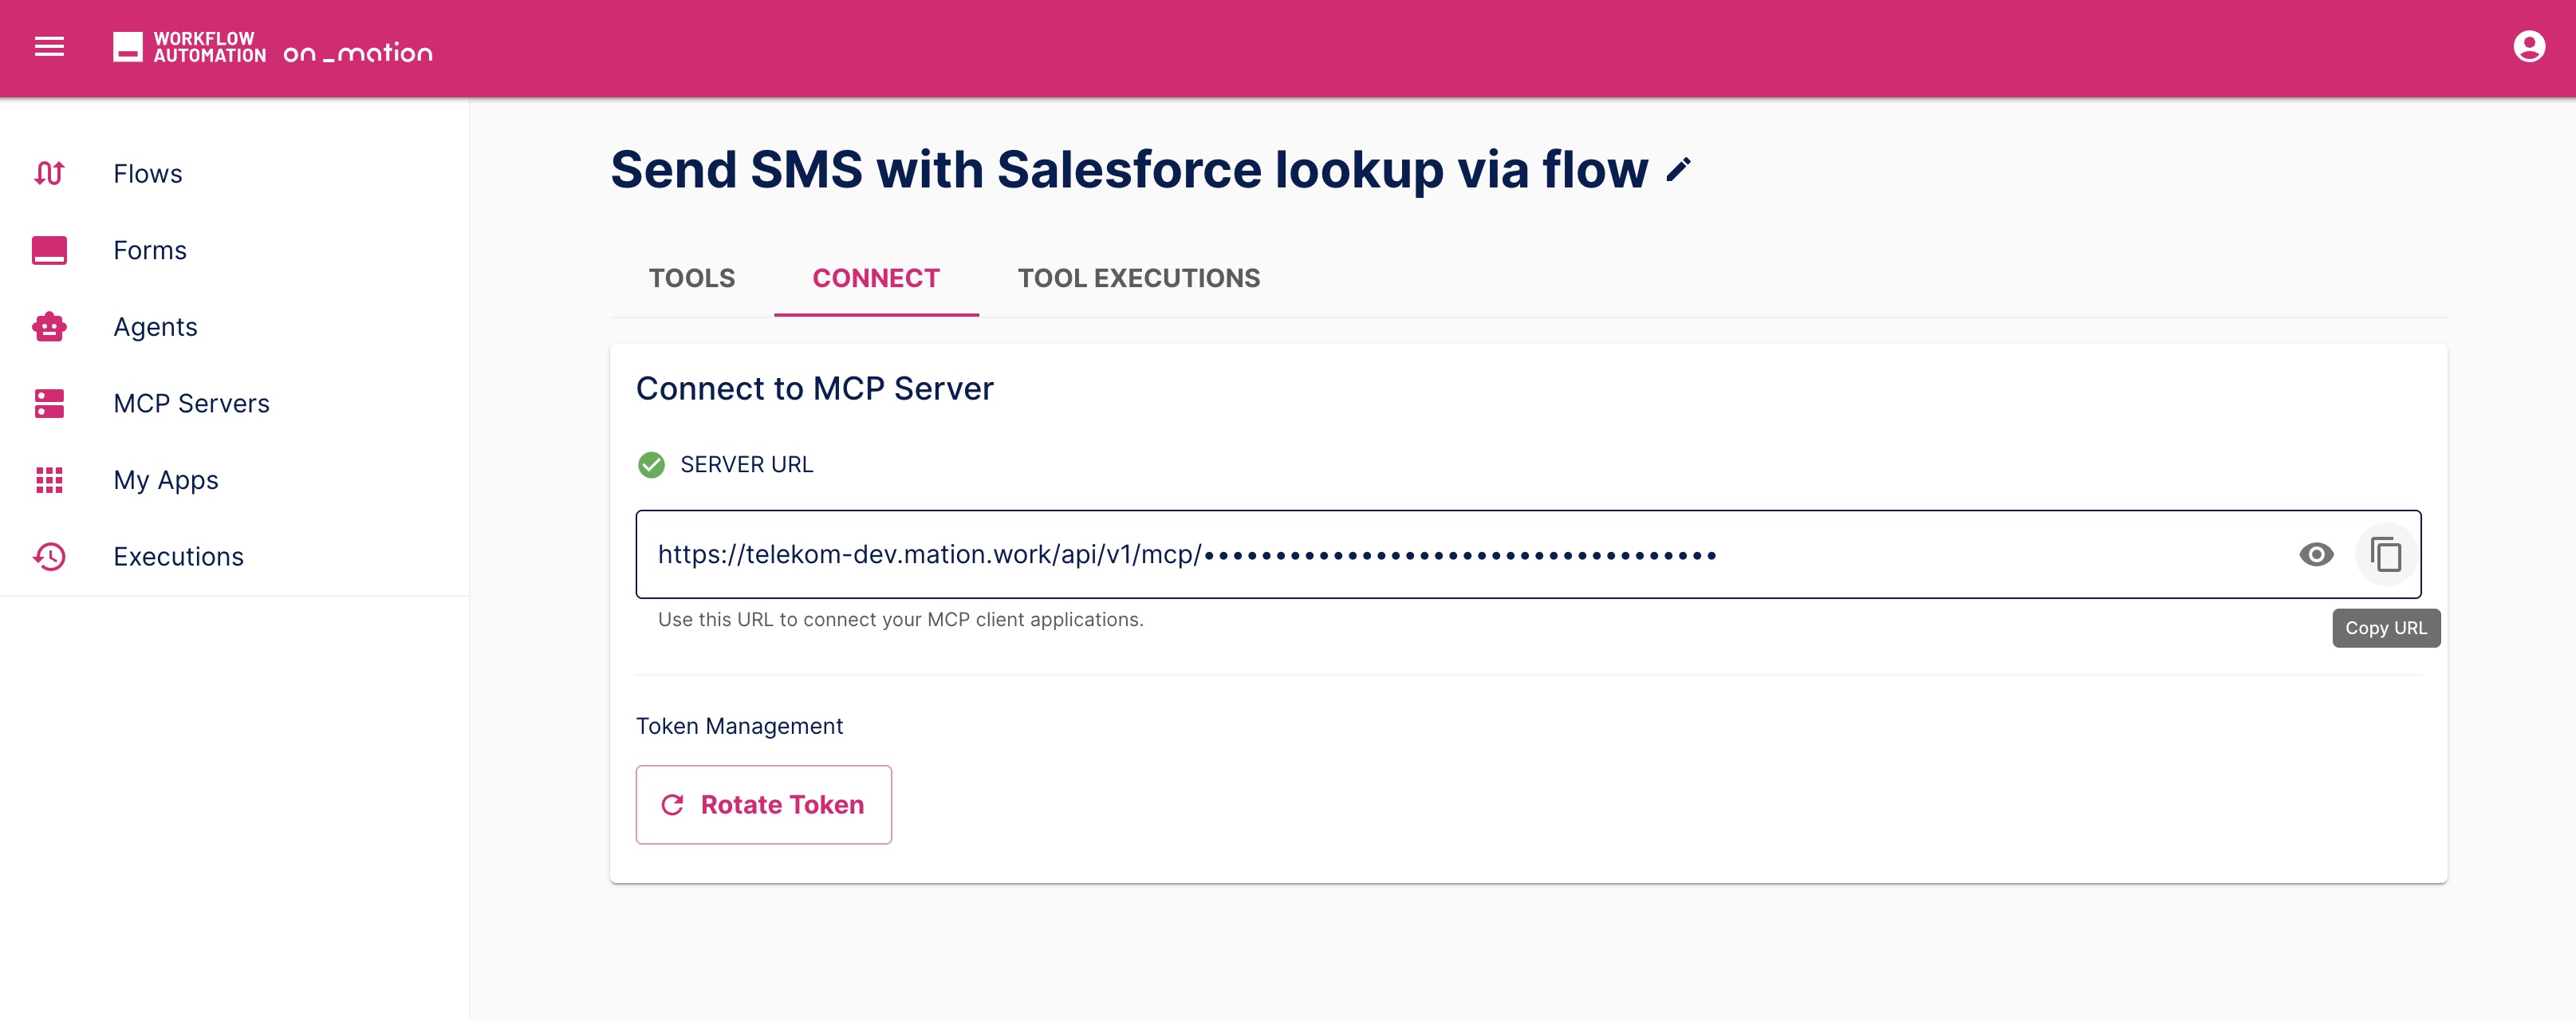
Go to Connect. Copy the Server URL displayed at the top of the MCP server configuration. You'll need this to configure the MCP server at your AI client.
Step 2: Configure Your AI Client (Claude)
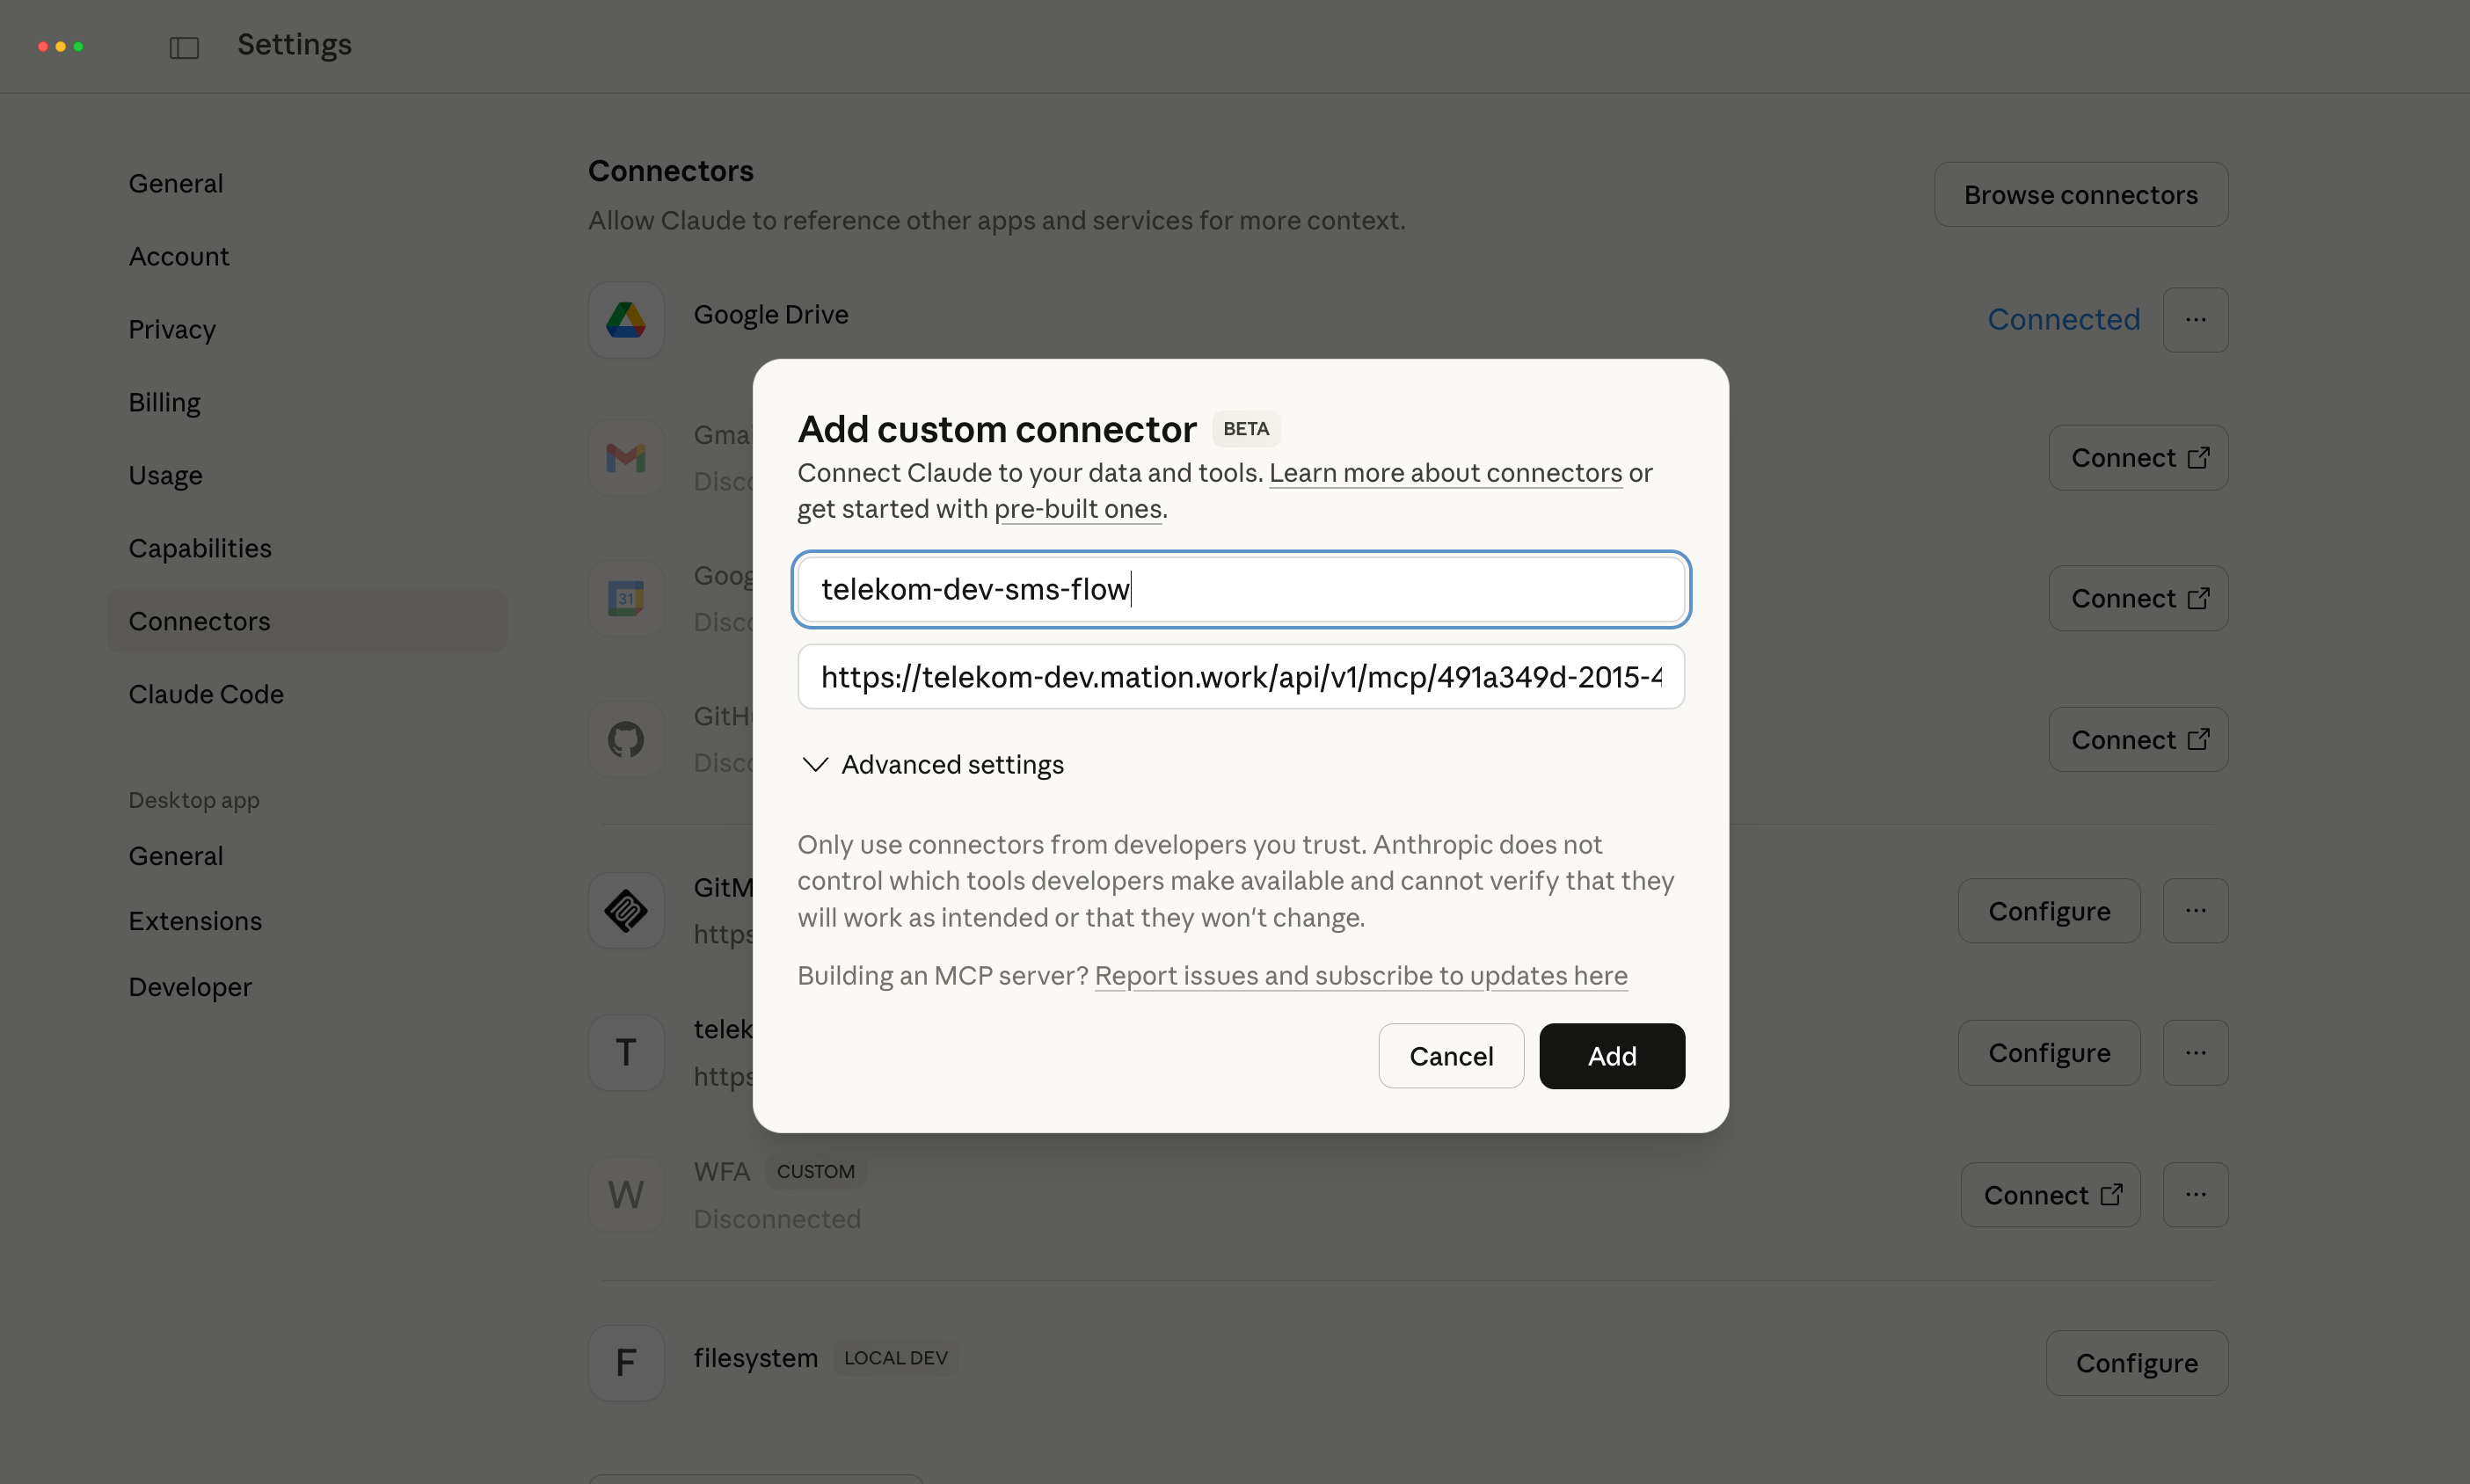
- In Claude, go to Settings → Connectors and add a new custom connector. Name it and paste the MCP Server URL you copied. Any other MCP-compatible AI client has a similar configuration.
Step 3: Use the Tool in Chat
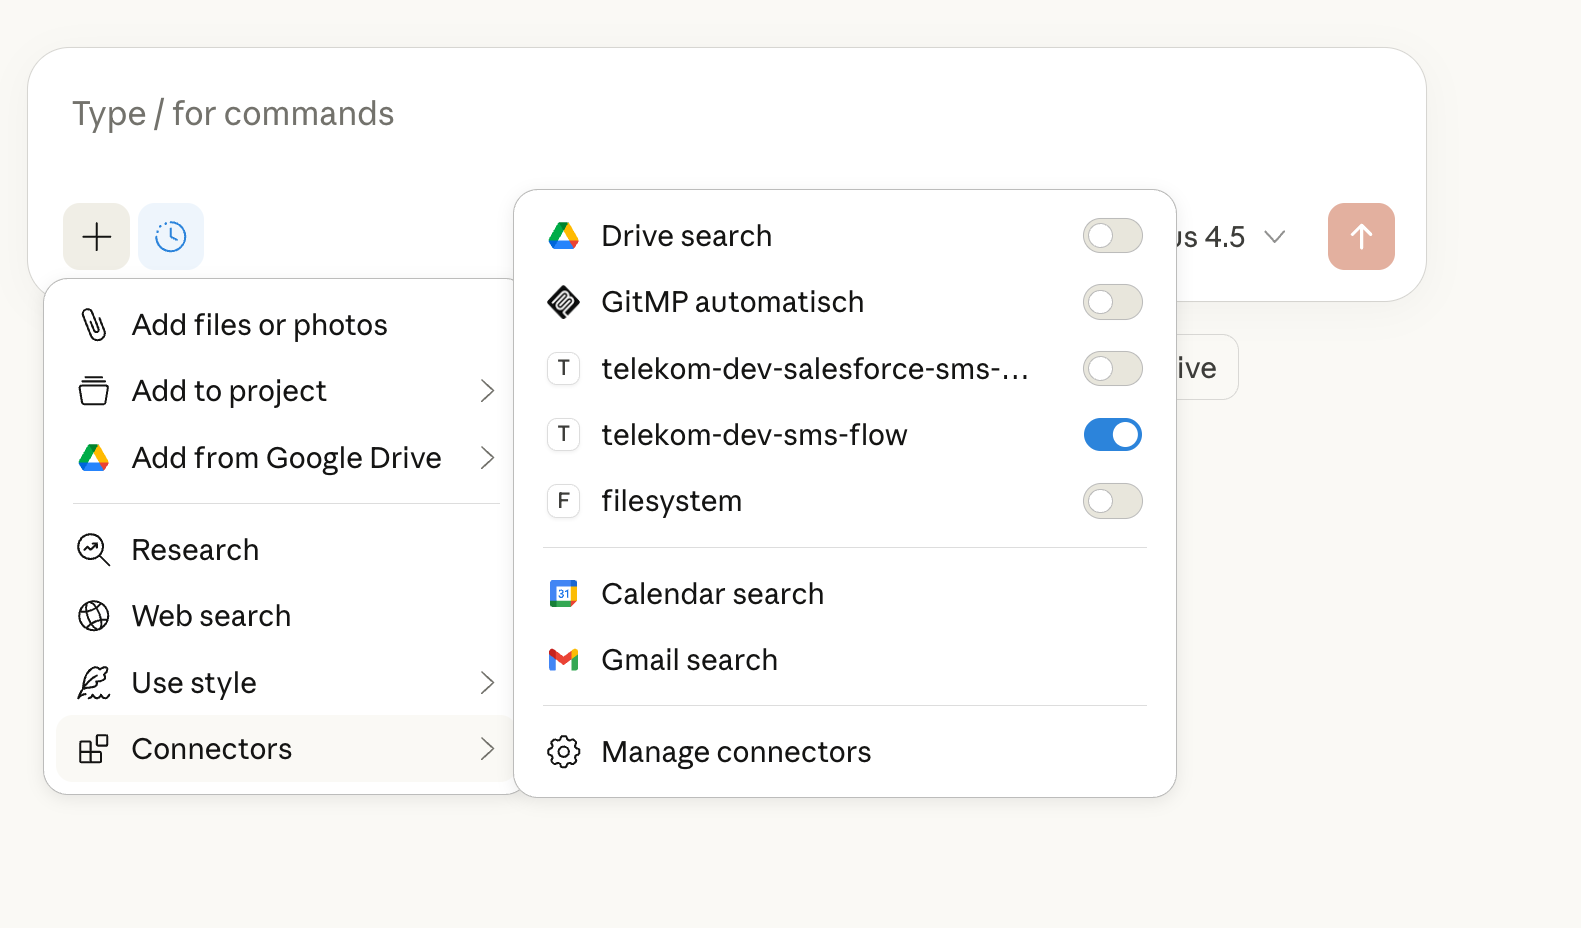
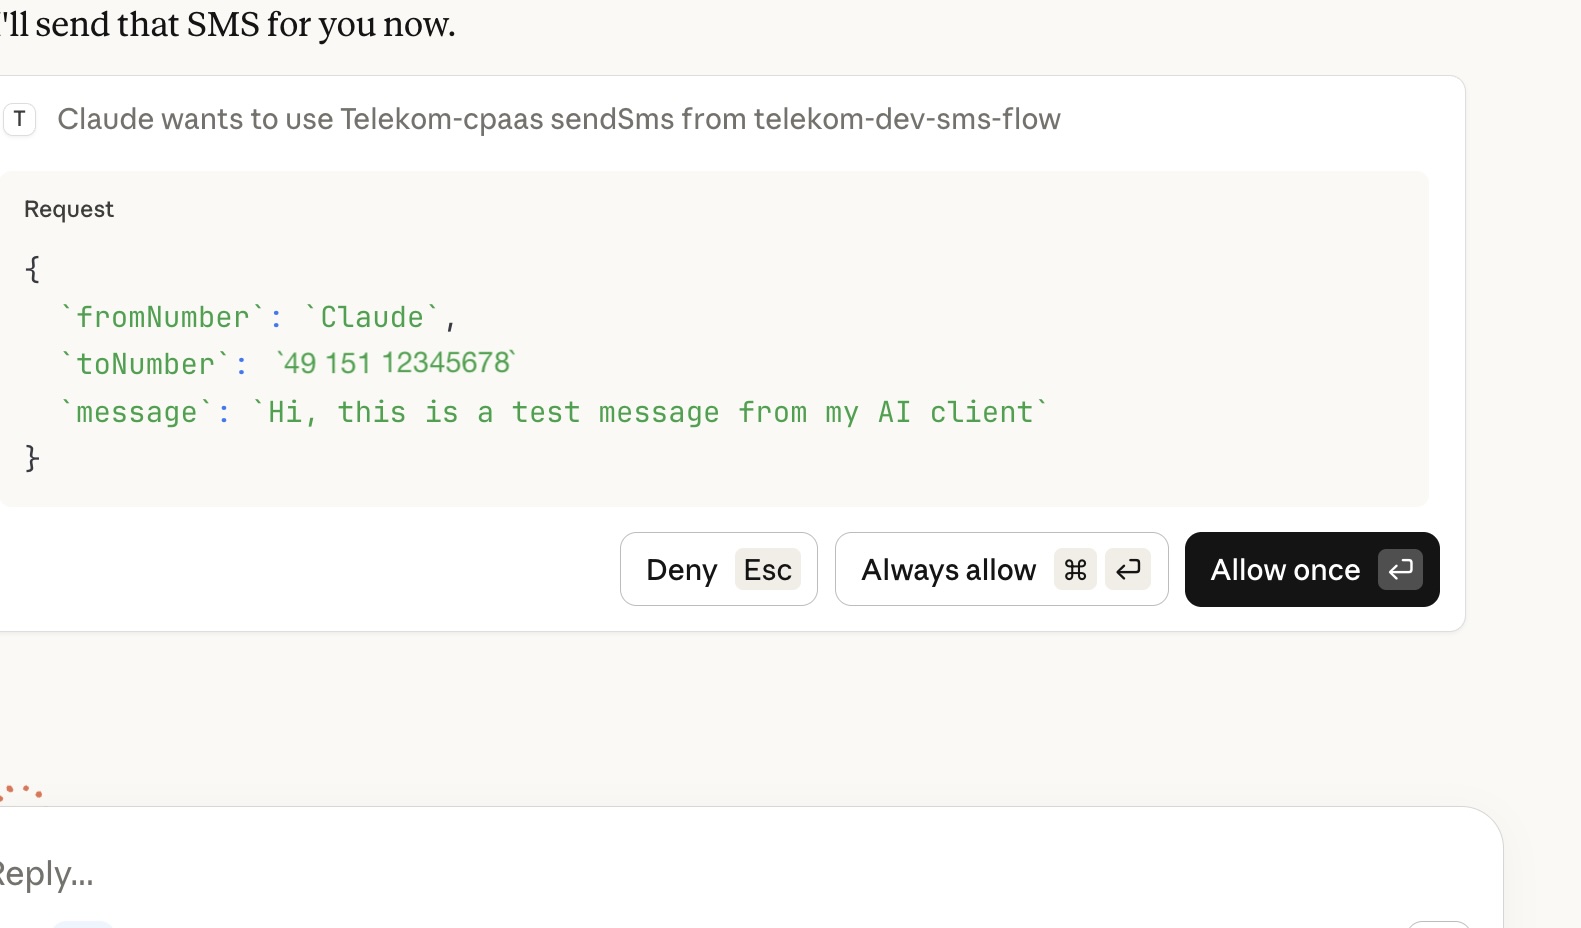
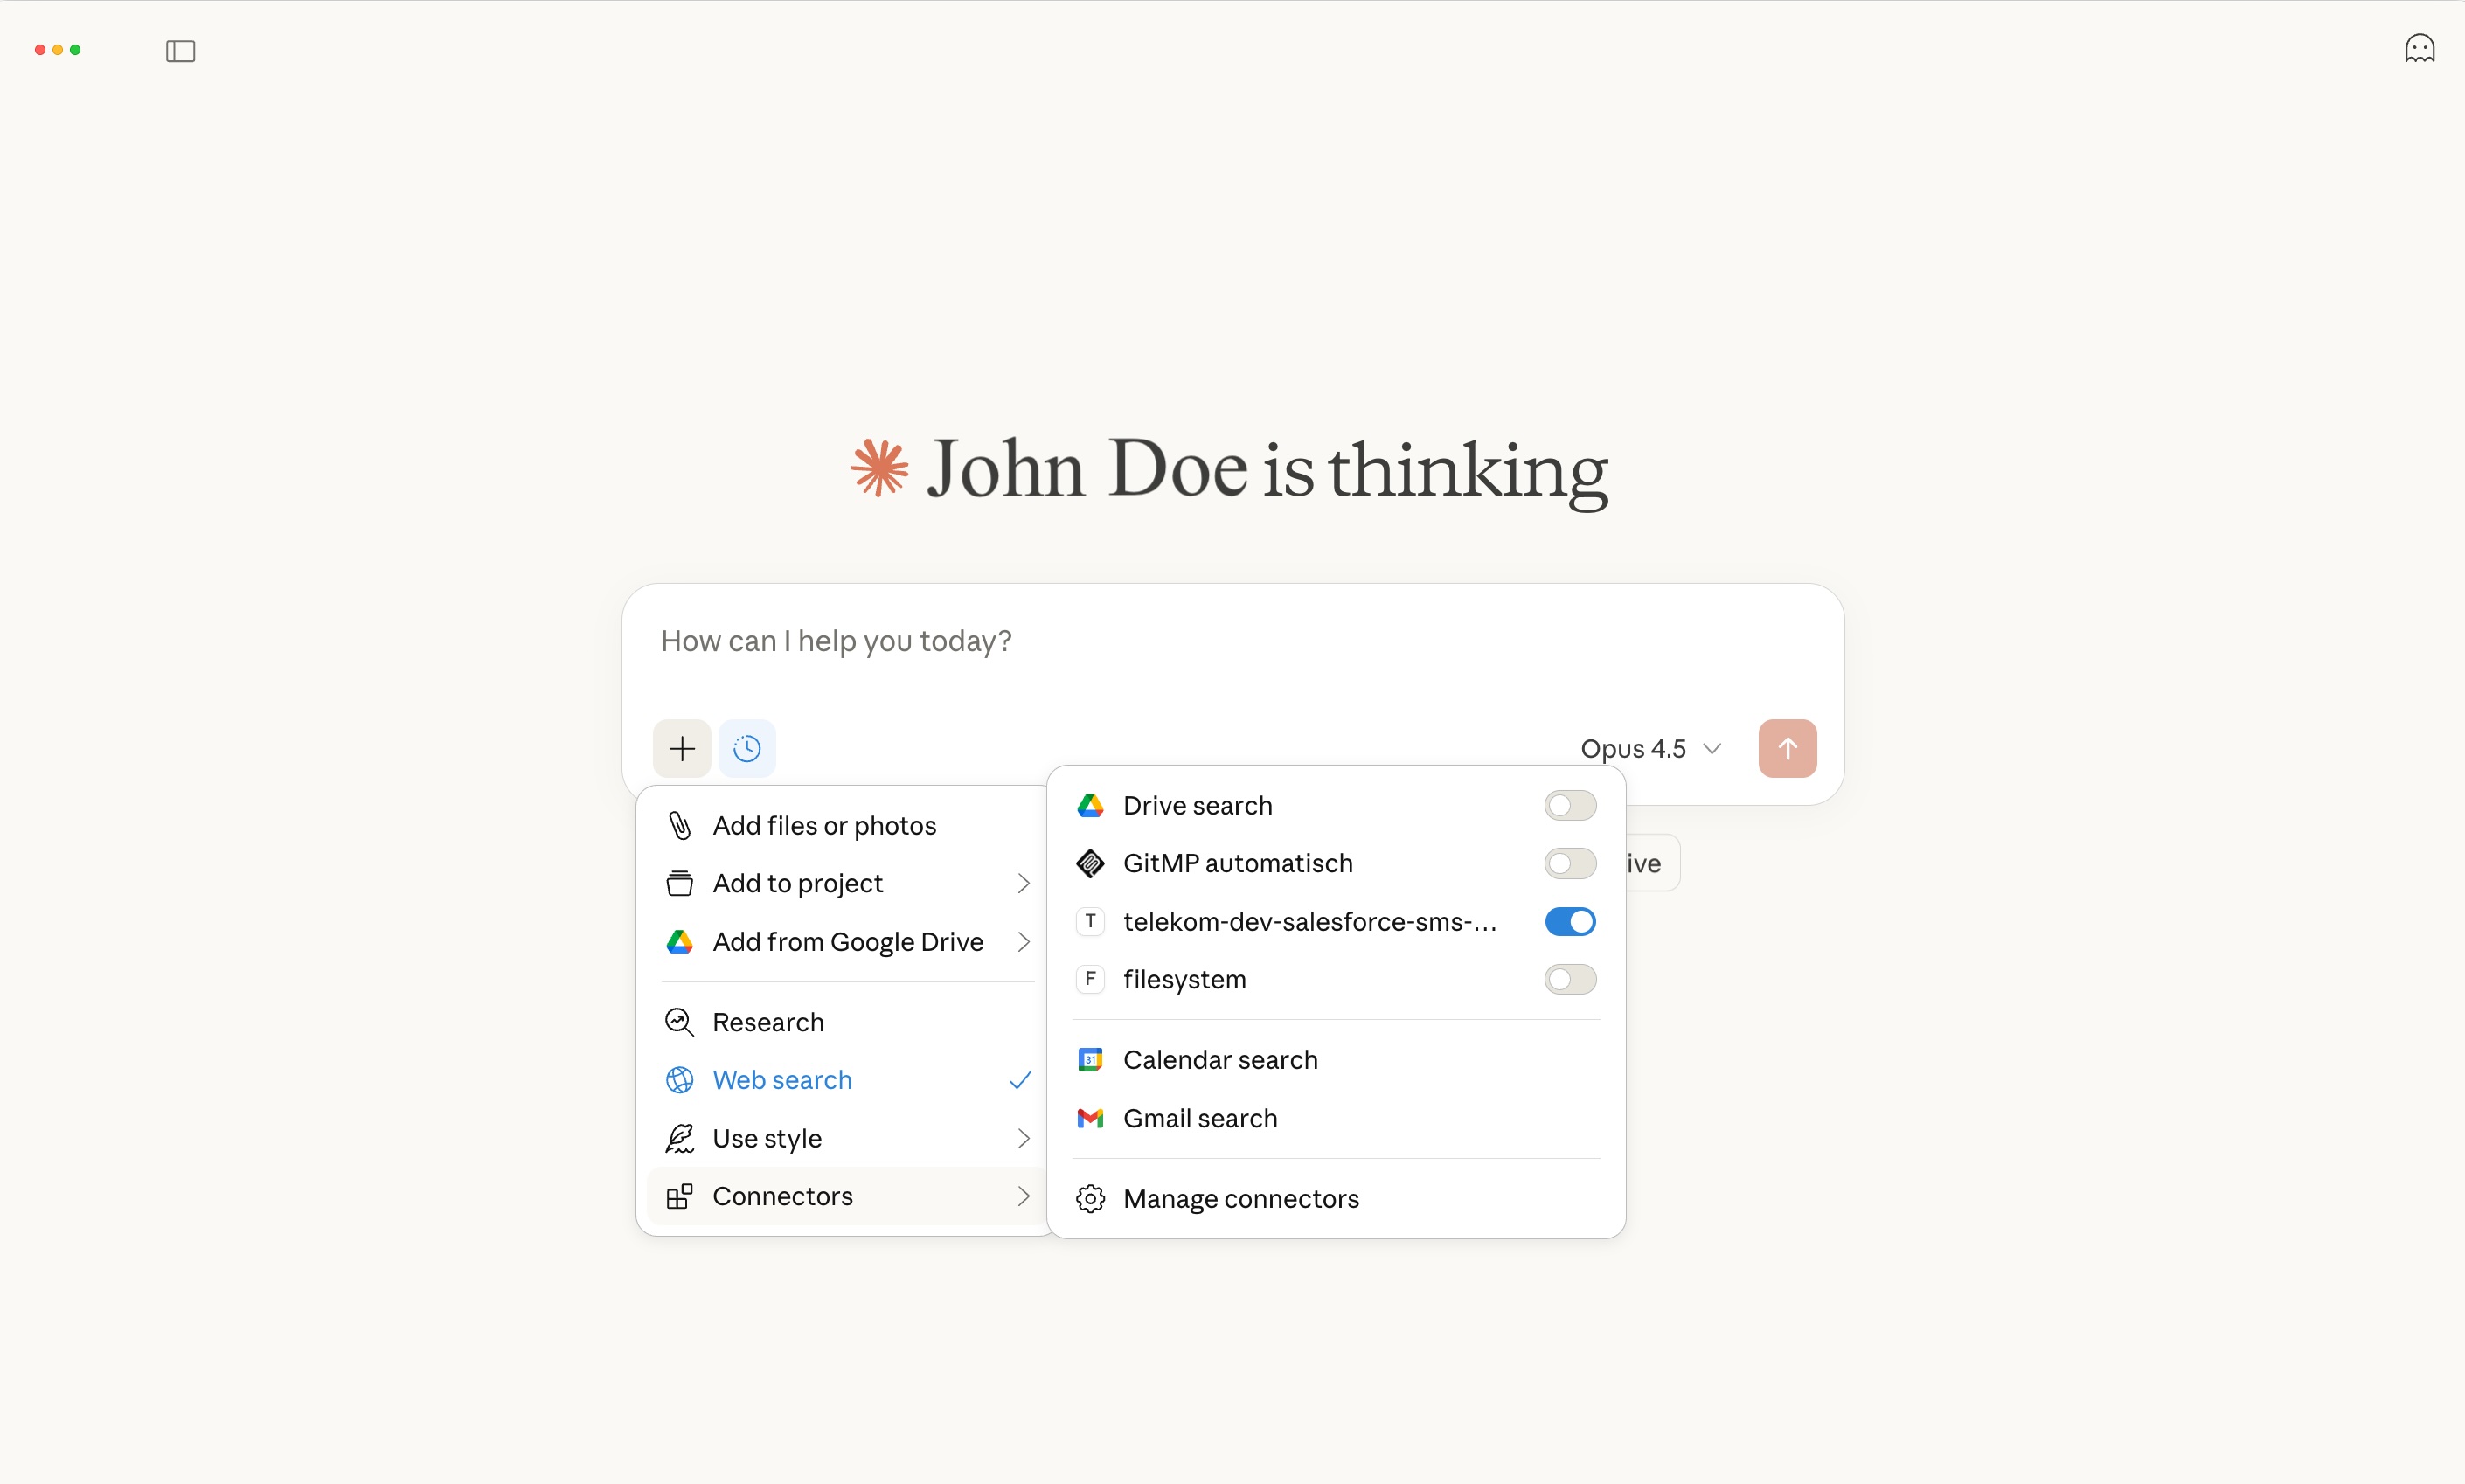
Start a New Chat in Claude, click on the '+', and activate your custom MCP connector.
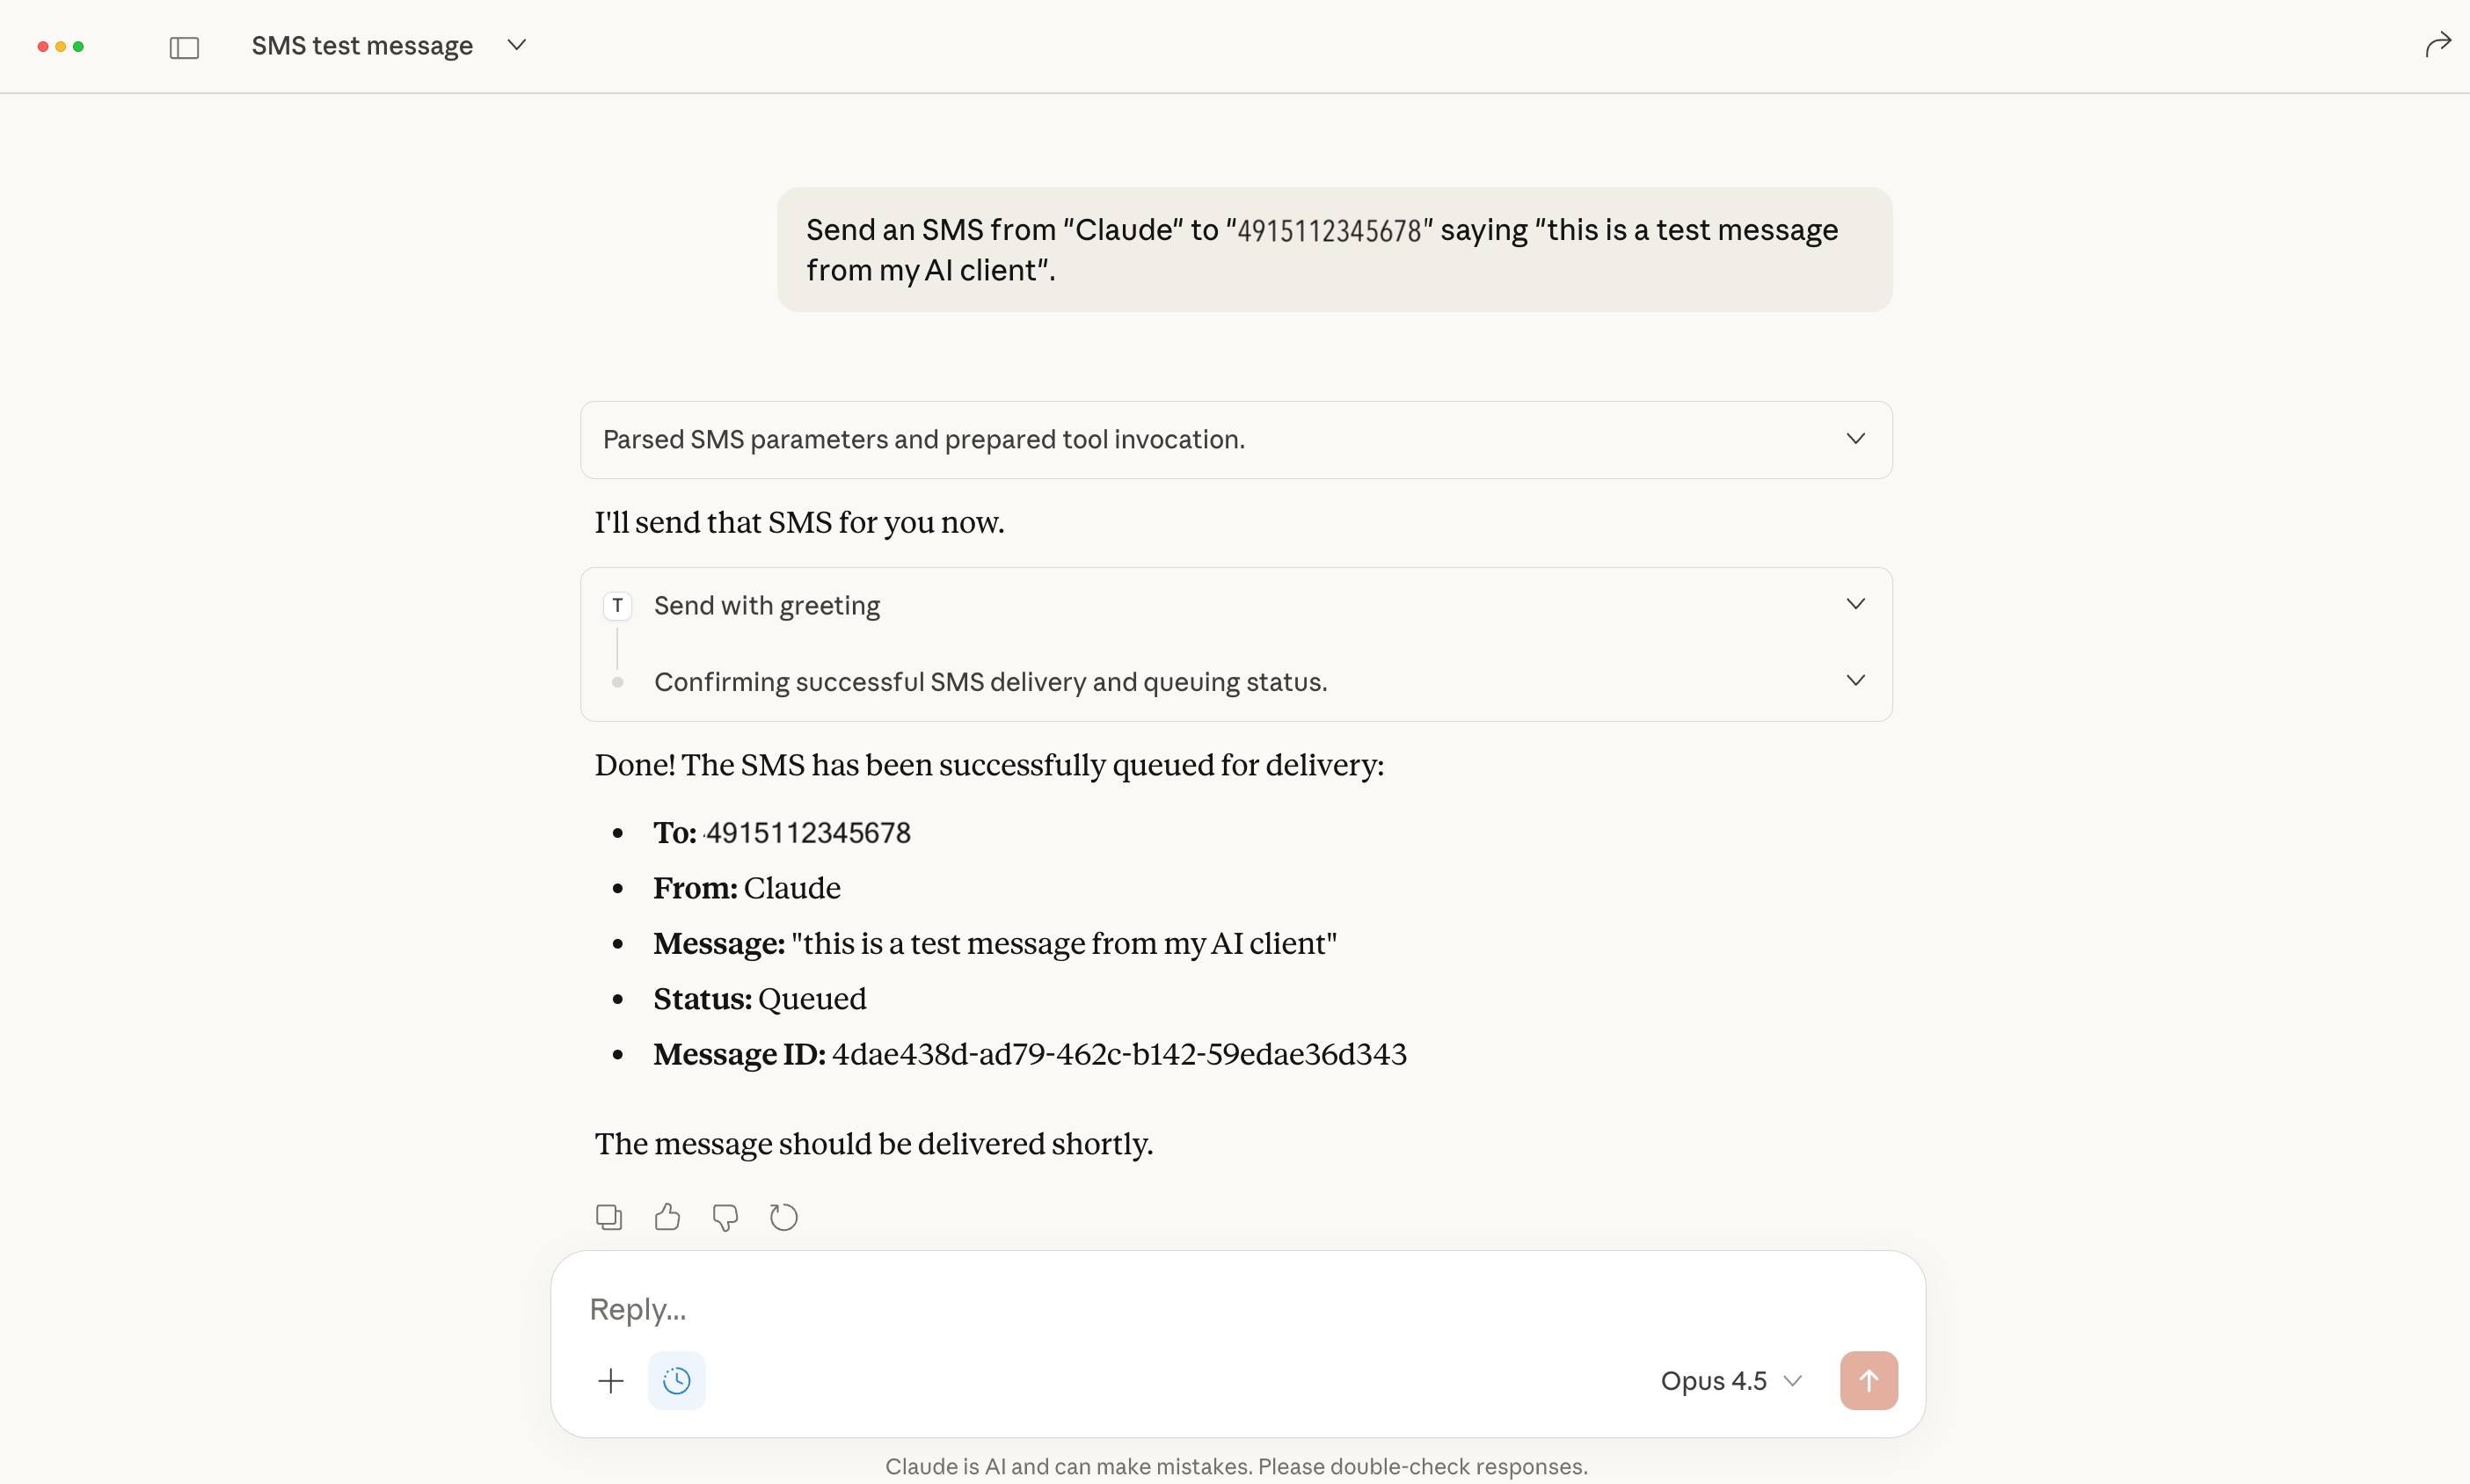
 Once configured, go to the chat window - you can now ask Claude to send SMS messages using natural language:
"Send an SMS from 'Claude' to 'SMS capable phone number' saying 'Hi, this is a test message from my AI client'"
Claude will call your MCP tool, ask for allowance, execute the action, and display the result.
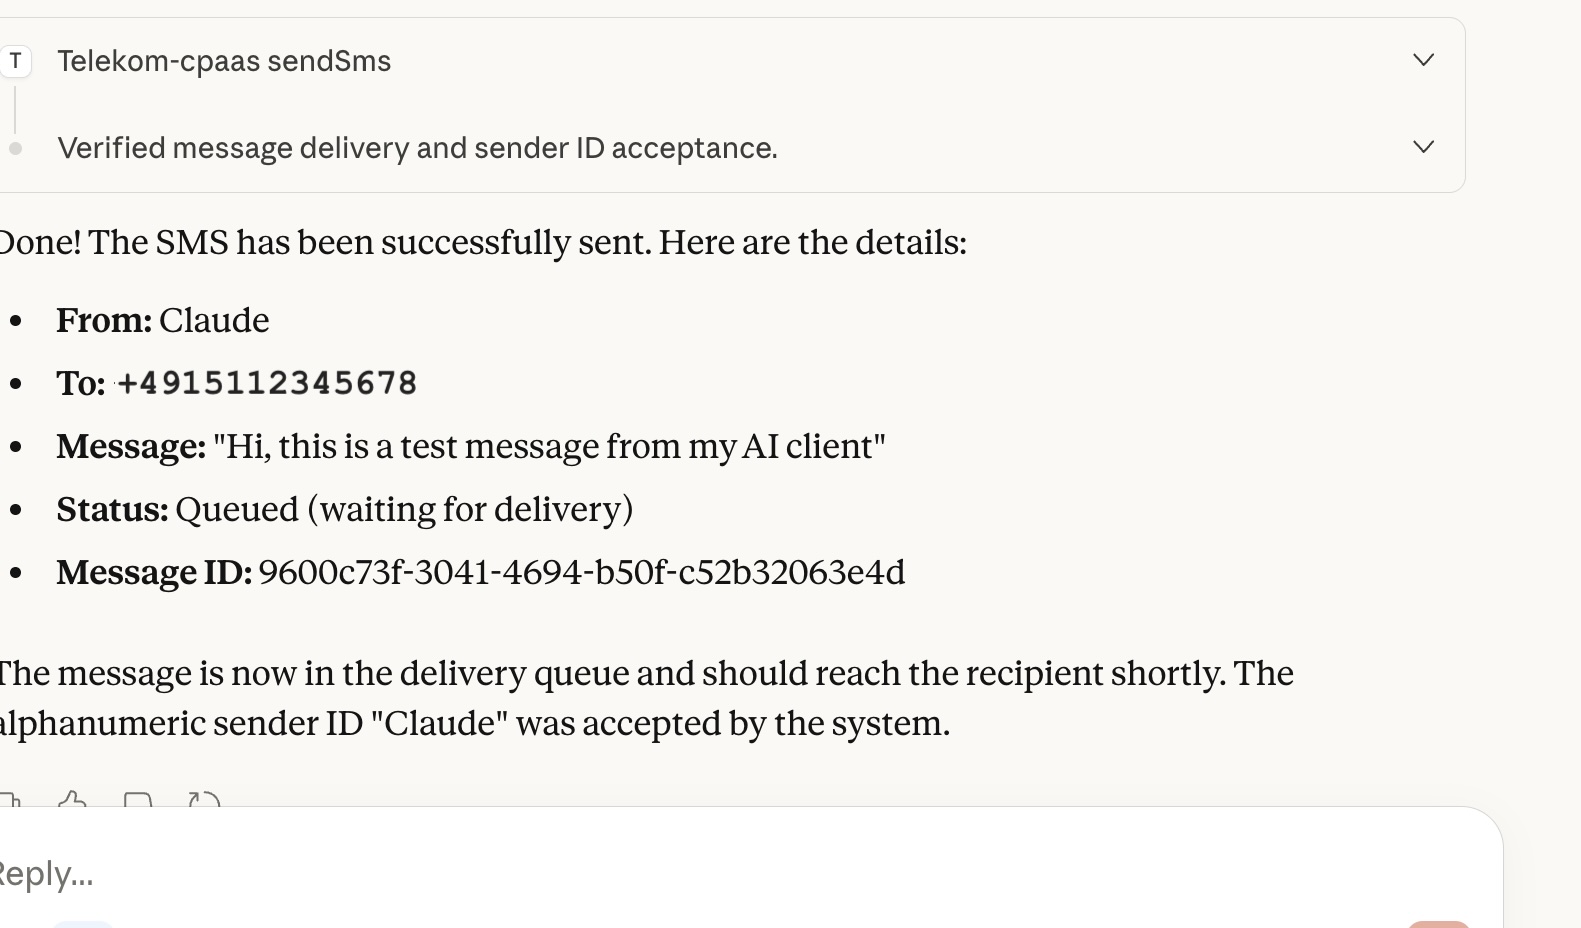 Et voilà - you have sent an SMS directly via your AI chat client using natural language without any further steps, thanks to Workflow Automation's MCP!
TIP
The MCP server automatically generates input field documentation from the app integration, so your AI assistant knows exactly what parameters are needed, so you do not have to.
Use Case 2: Flow Tool (Salesforce Lookup + Personalized SMS)
In this advanced example, the user provides a phone number and a message to the AI chat client. The integrated MCP server calls a Workflow Automation flow that looks up contacts in Salesforce by phone number, retrieves the contact's name if the number exists, and sends a personalized SMS greeting. The entire flow is exposed as a single MCP tool.
The following steps explain the flow and how to create, configure, and integrate the MCP tool, triggering the flow in Workflow Automation and in the AI chat client. To shorten the documentation, we assume that Salesforce and CPaaS are already connected apps.
We have used an existing flow in the screenshots to make the next steps easier to see and anticipate the motivation for each step.
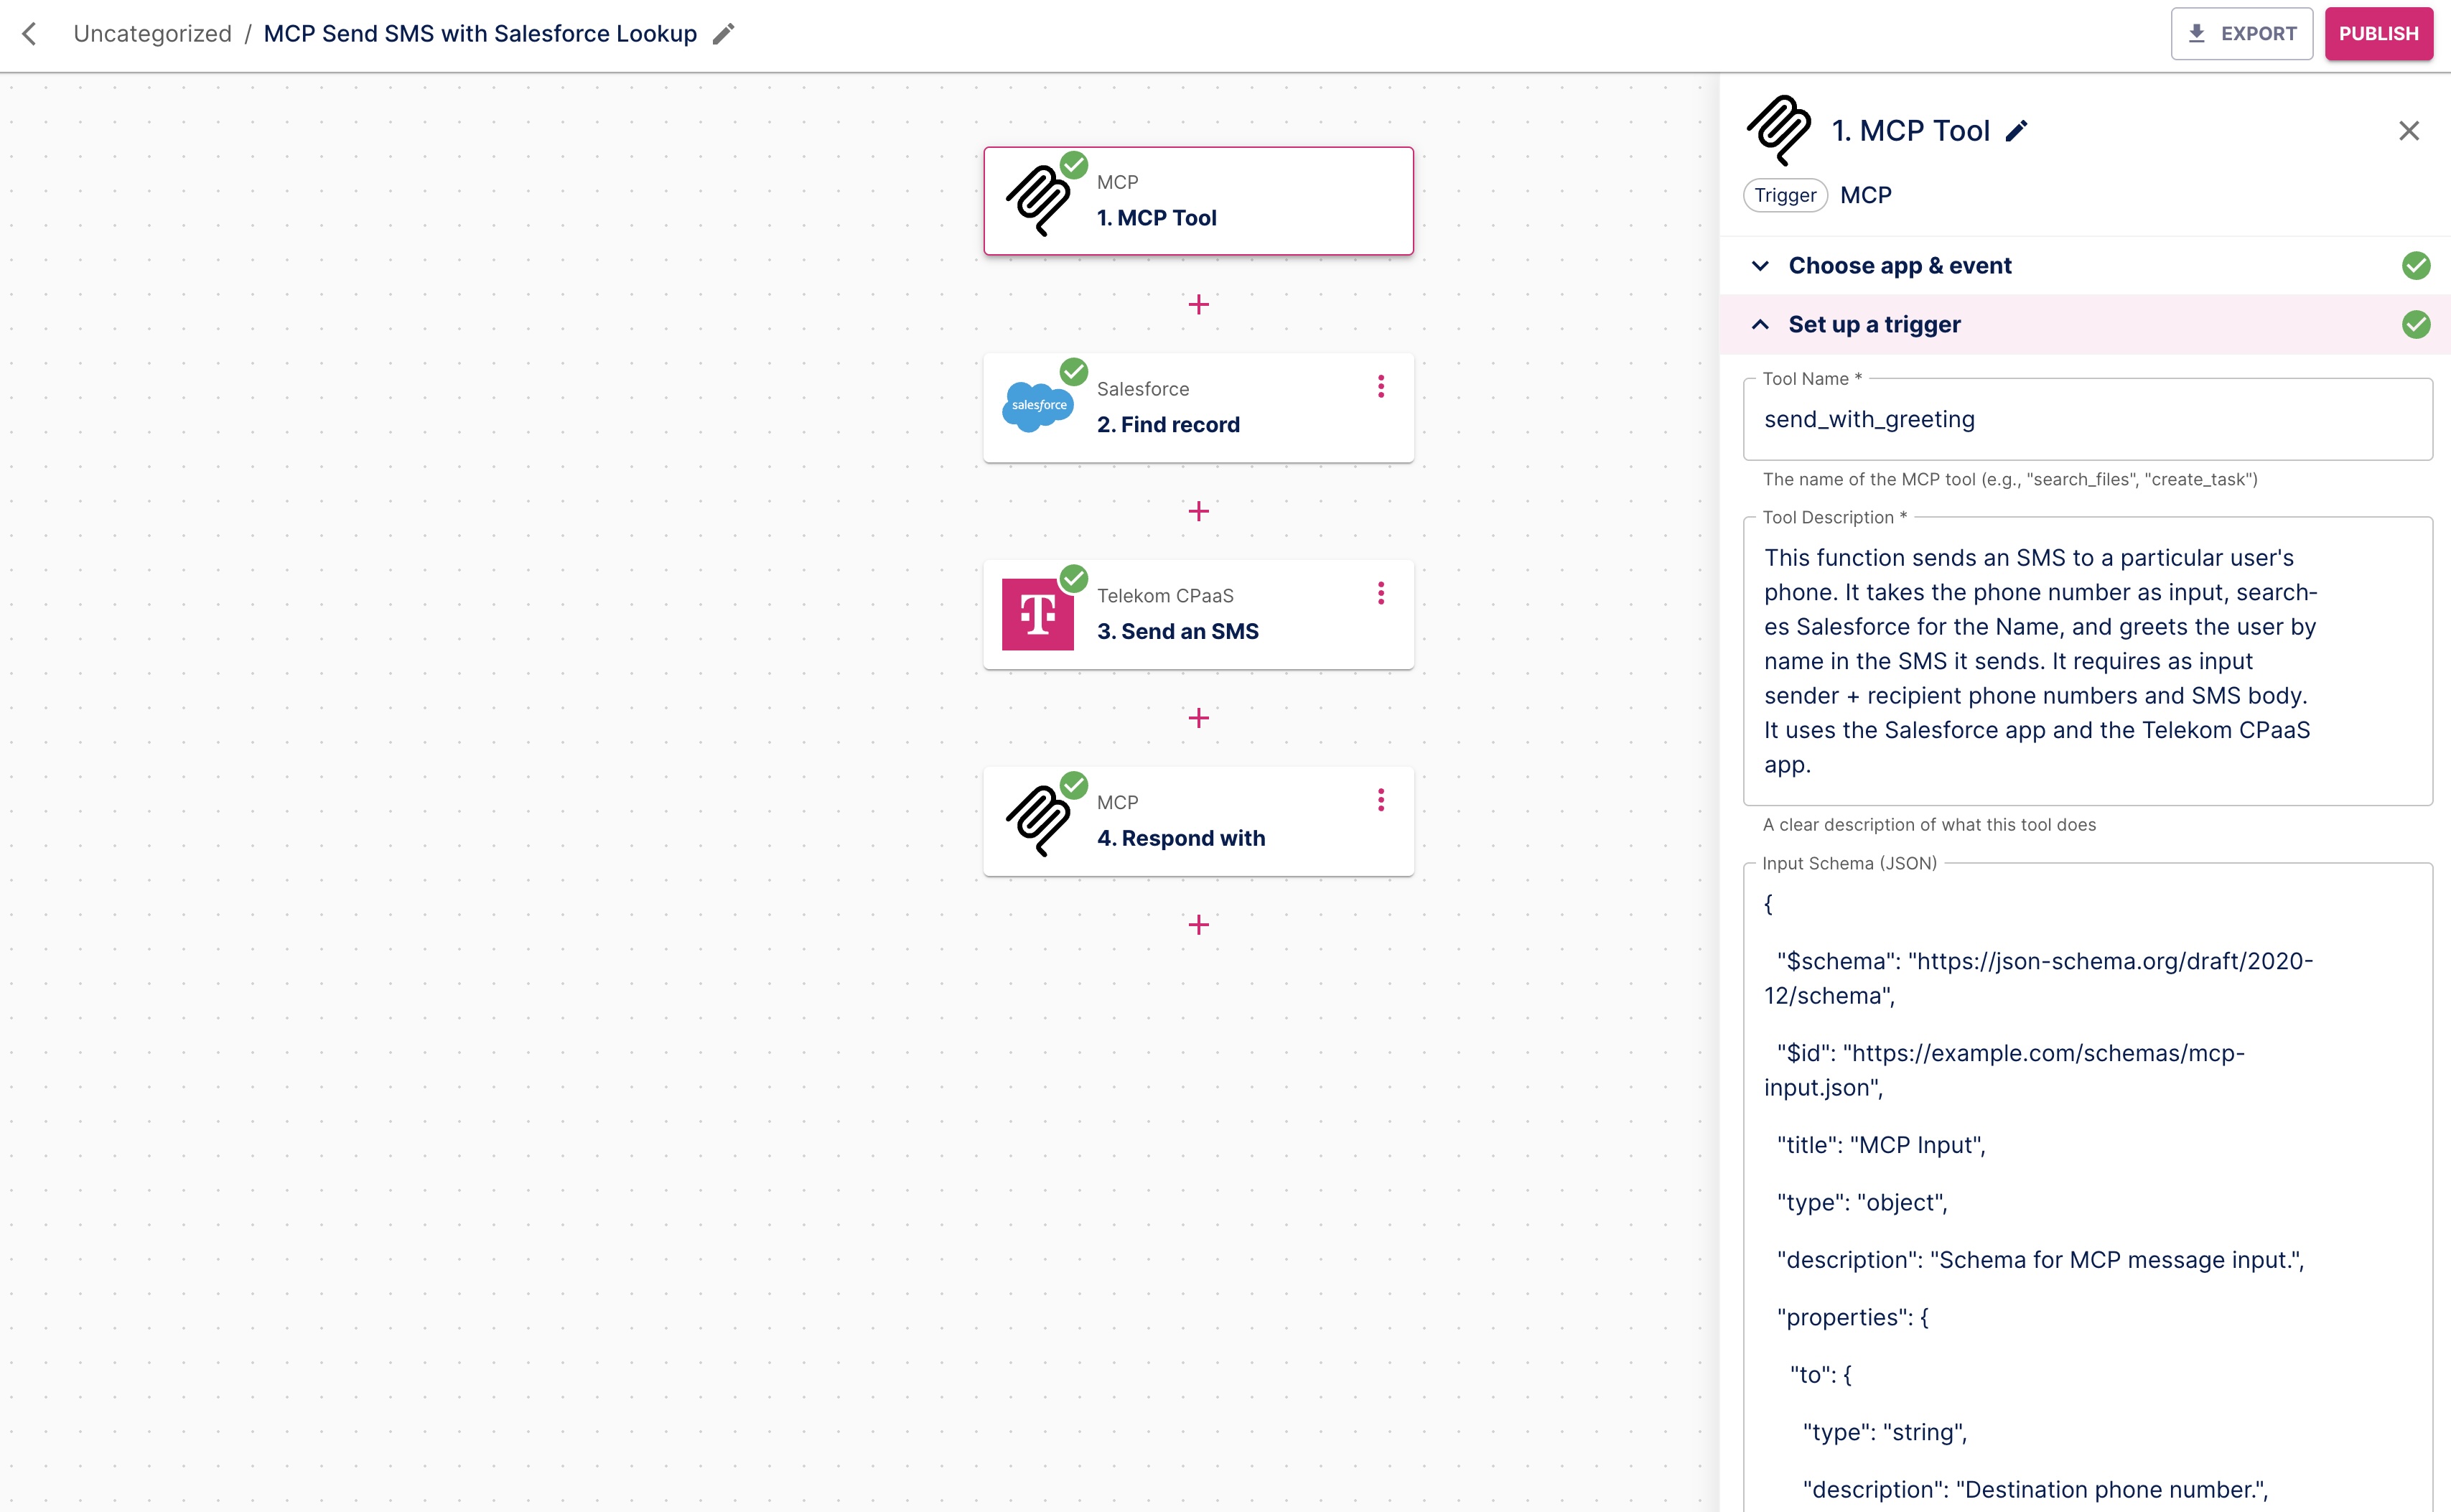
Step 1: Create the MCP Flow
Create a new flow in Workflow Automation. Select MCP as the app and MCP Tool as the trigger event. Click Continue.

Describe the MCP trigger with a self-explanatory title and add a description. Be aware that the information will be consumed and interpreted by an AI, which is good at handling natural language, so be explicit and use natural language.
- Name:
send_with_greeting - Description: A clear description of what the tool does (this helps the AI understand when to use it).
- Name:
Define the Input Schema as JSON to specify what parameters the AI should provide. This is a rather technical step, but it does improve the ease of use in the AI chat client, since you can predefine the data the flow needs to execute the following steps: here, the phone number for the Salesforce lookup and the text for the personalized message. This field is optional. You might want to use AI to create this schema (as it is done in the example above).
json{ "type": "object", "properties": { "to": { "type": "string", "description": "Destination phone number" }, "from": { "type": "string", "description": "Source phone number or sender ID" }, "body": { "type": "string", "description": "Message body" } }, "required": ["to", "from", "body"] }
TIP
Make sure the Title is self-explanatory, and use natural language in the Description field; avoid being overly short. With a meaningful description of what the tool provides, the AI chat client can make a better decision about whether the tool is relevant to a prompt.
Try to provide an Input Schema, even if this is a bit of a technical exercise. If the data structure is not predefined, the user will most likely have to answer multiple questions via the AI chat client to gather all the necessary data for the flow to execute properly.
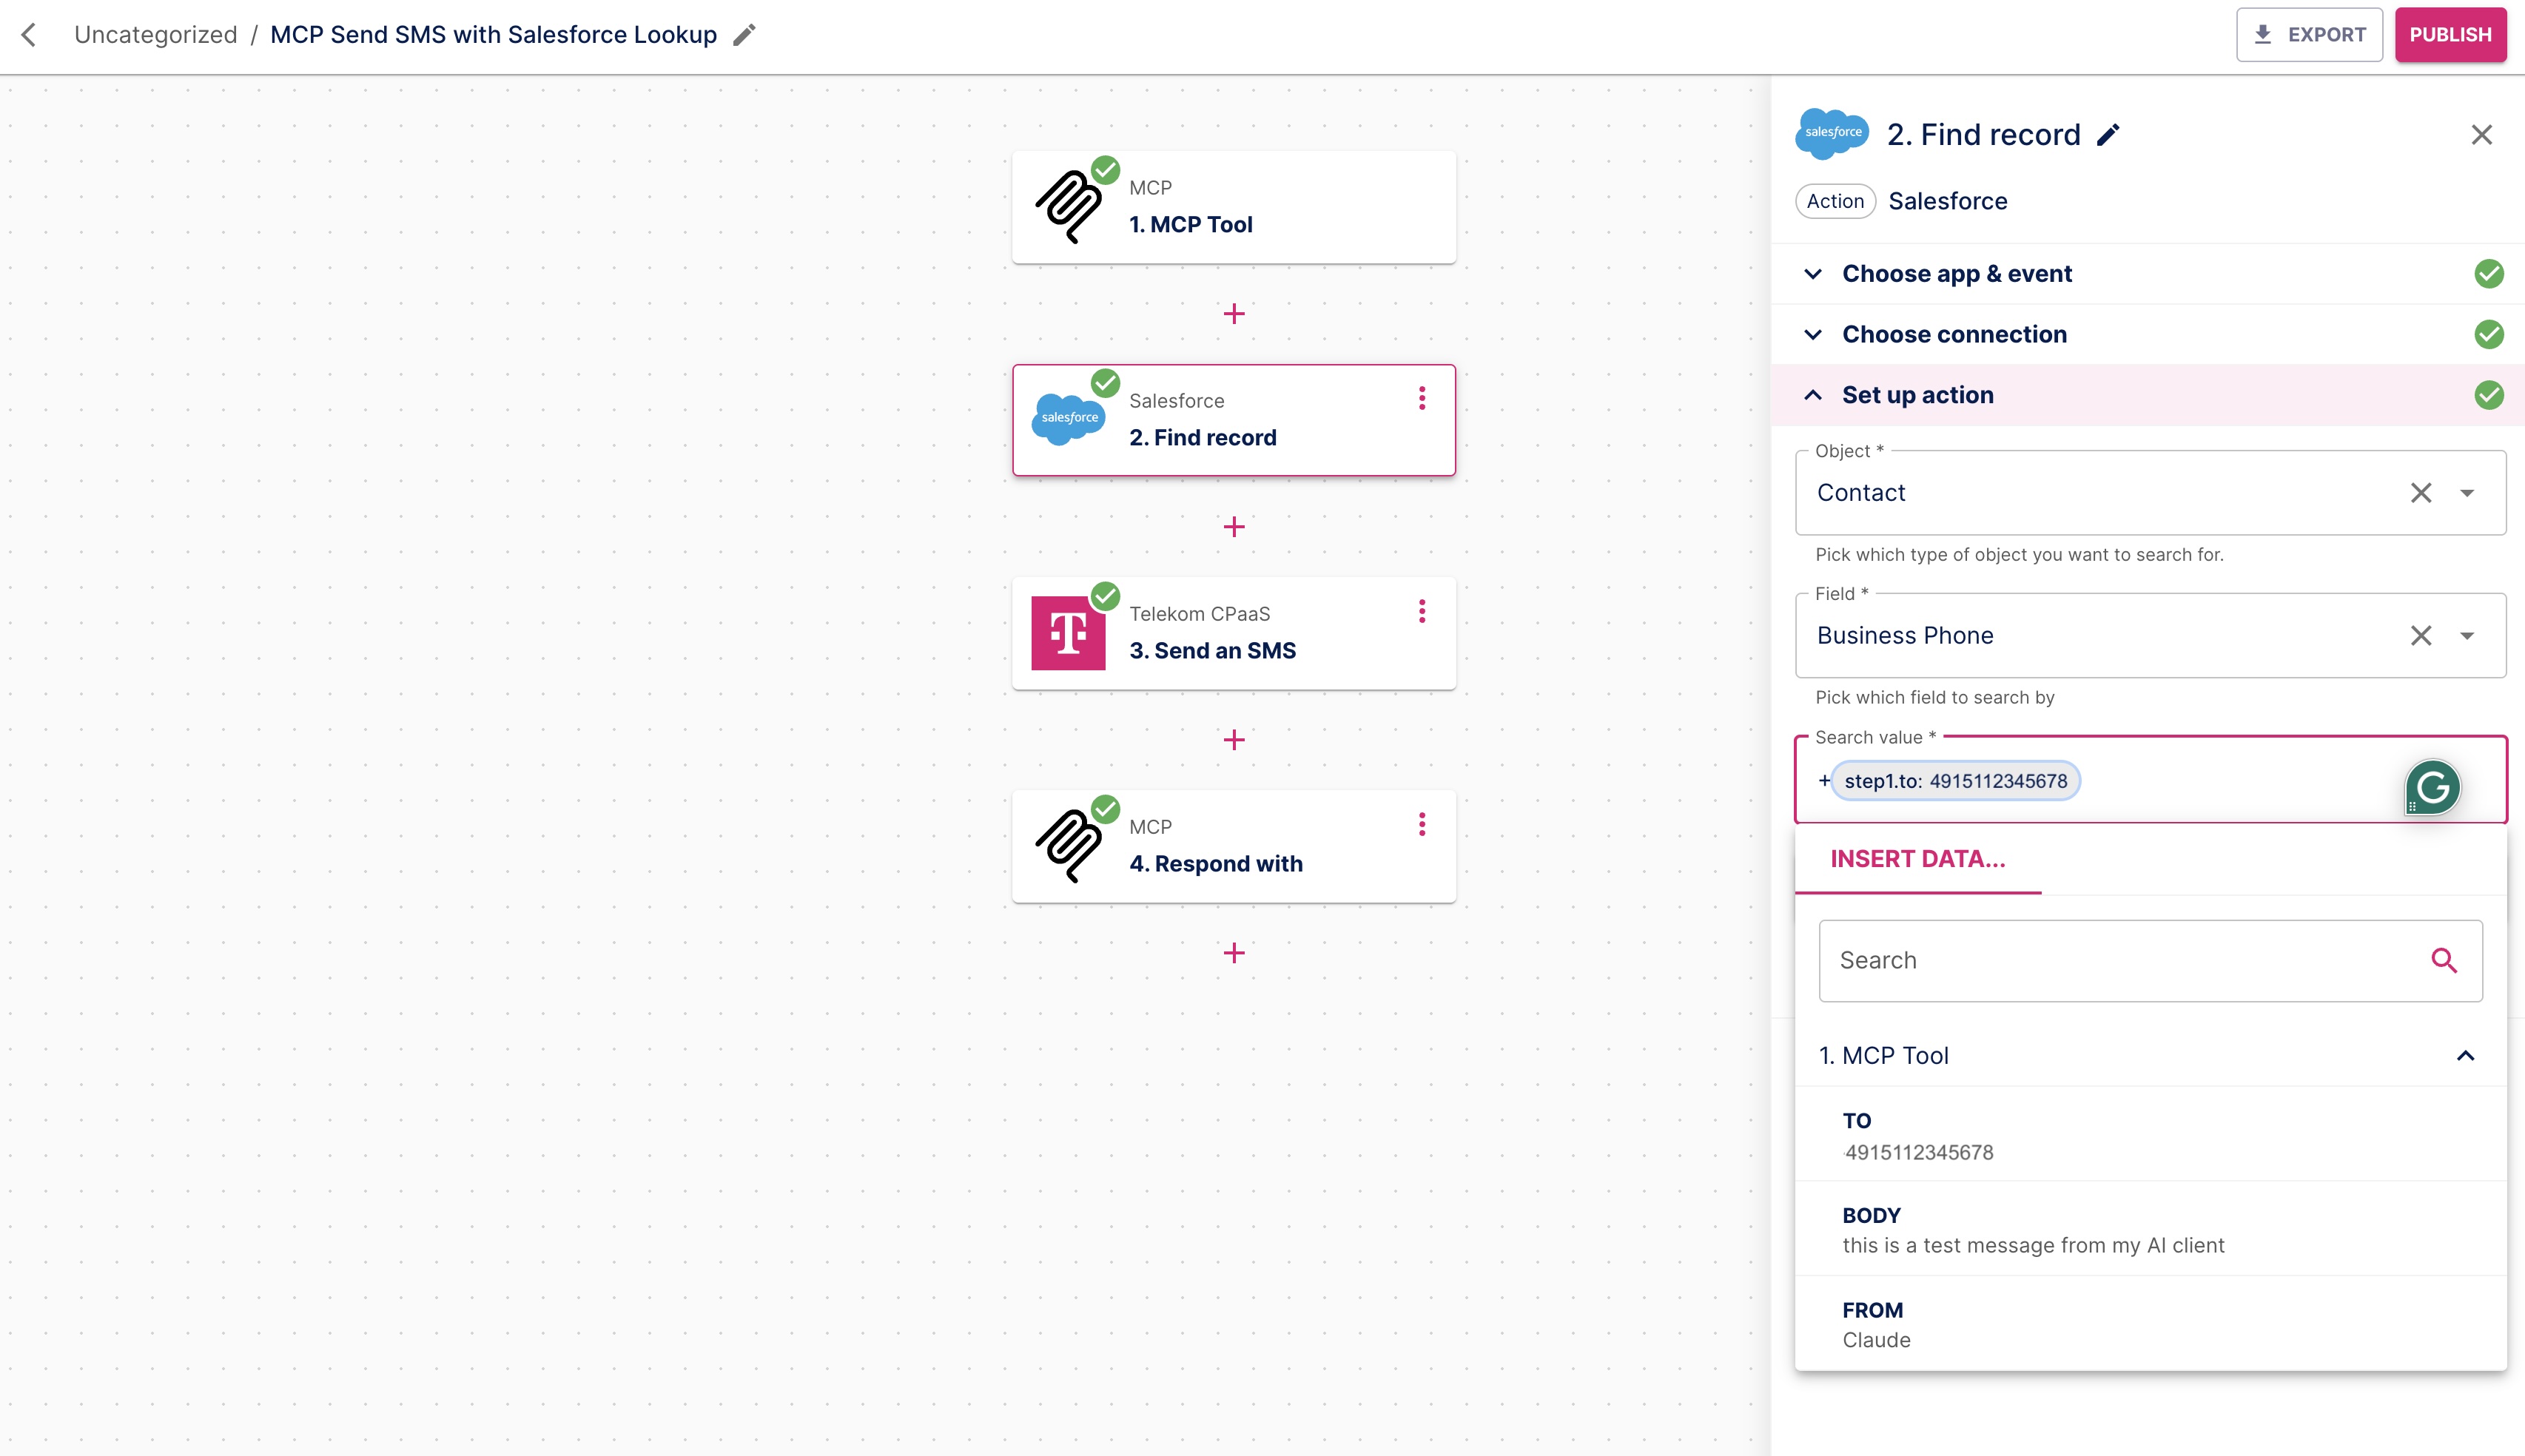
Step 2: The Salesforce Lookup
Add a new step: Select Salesforce as the app and Find Record as the action. Click Continue. Choose a pre-configured Salesforce connection and Continue.
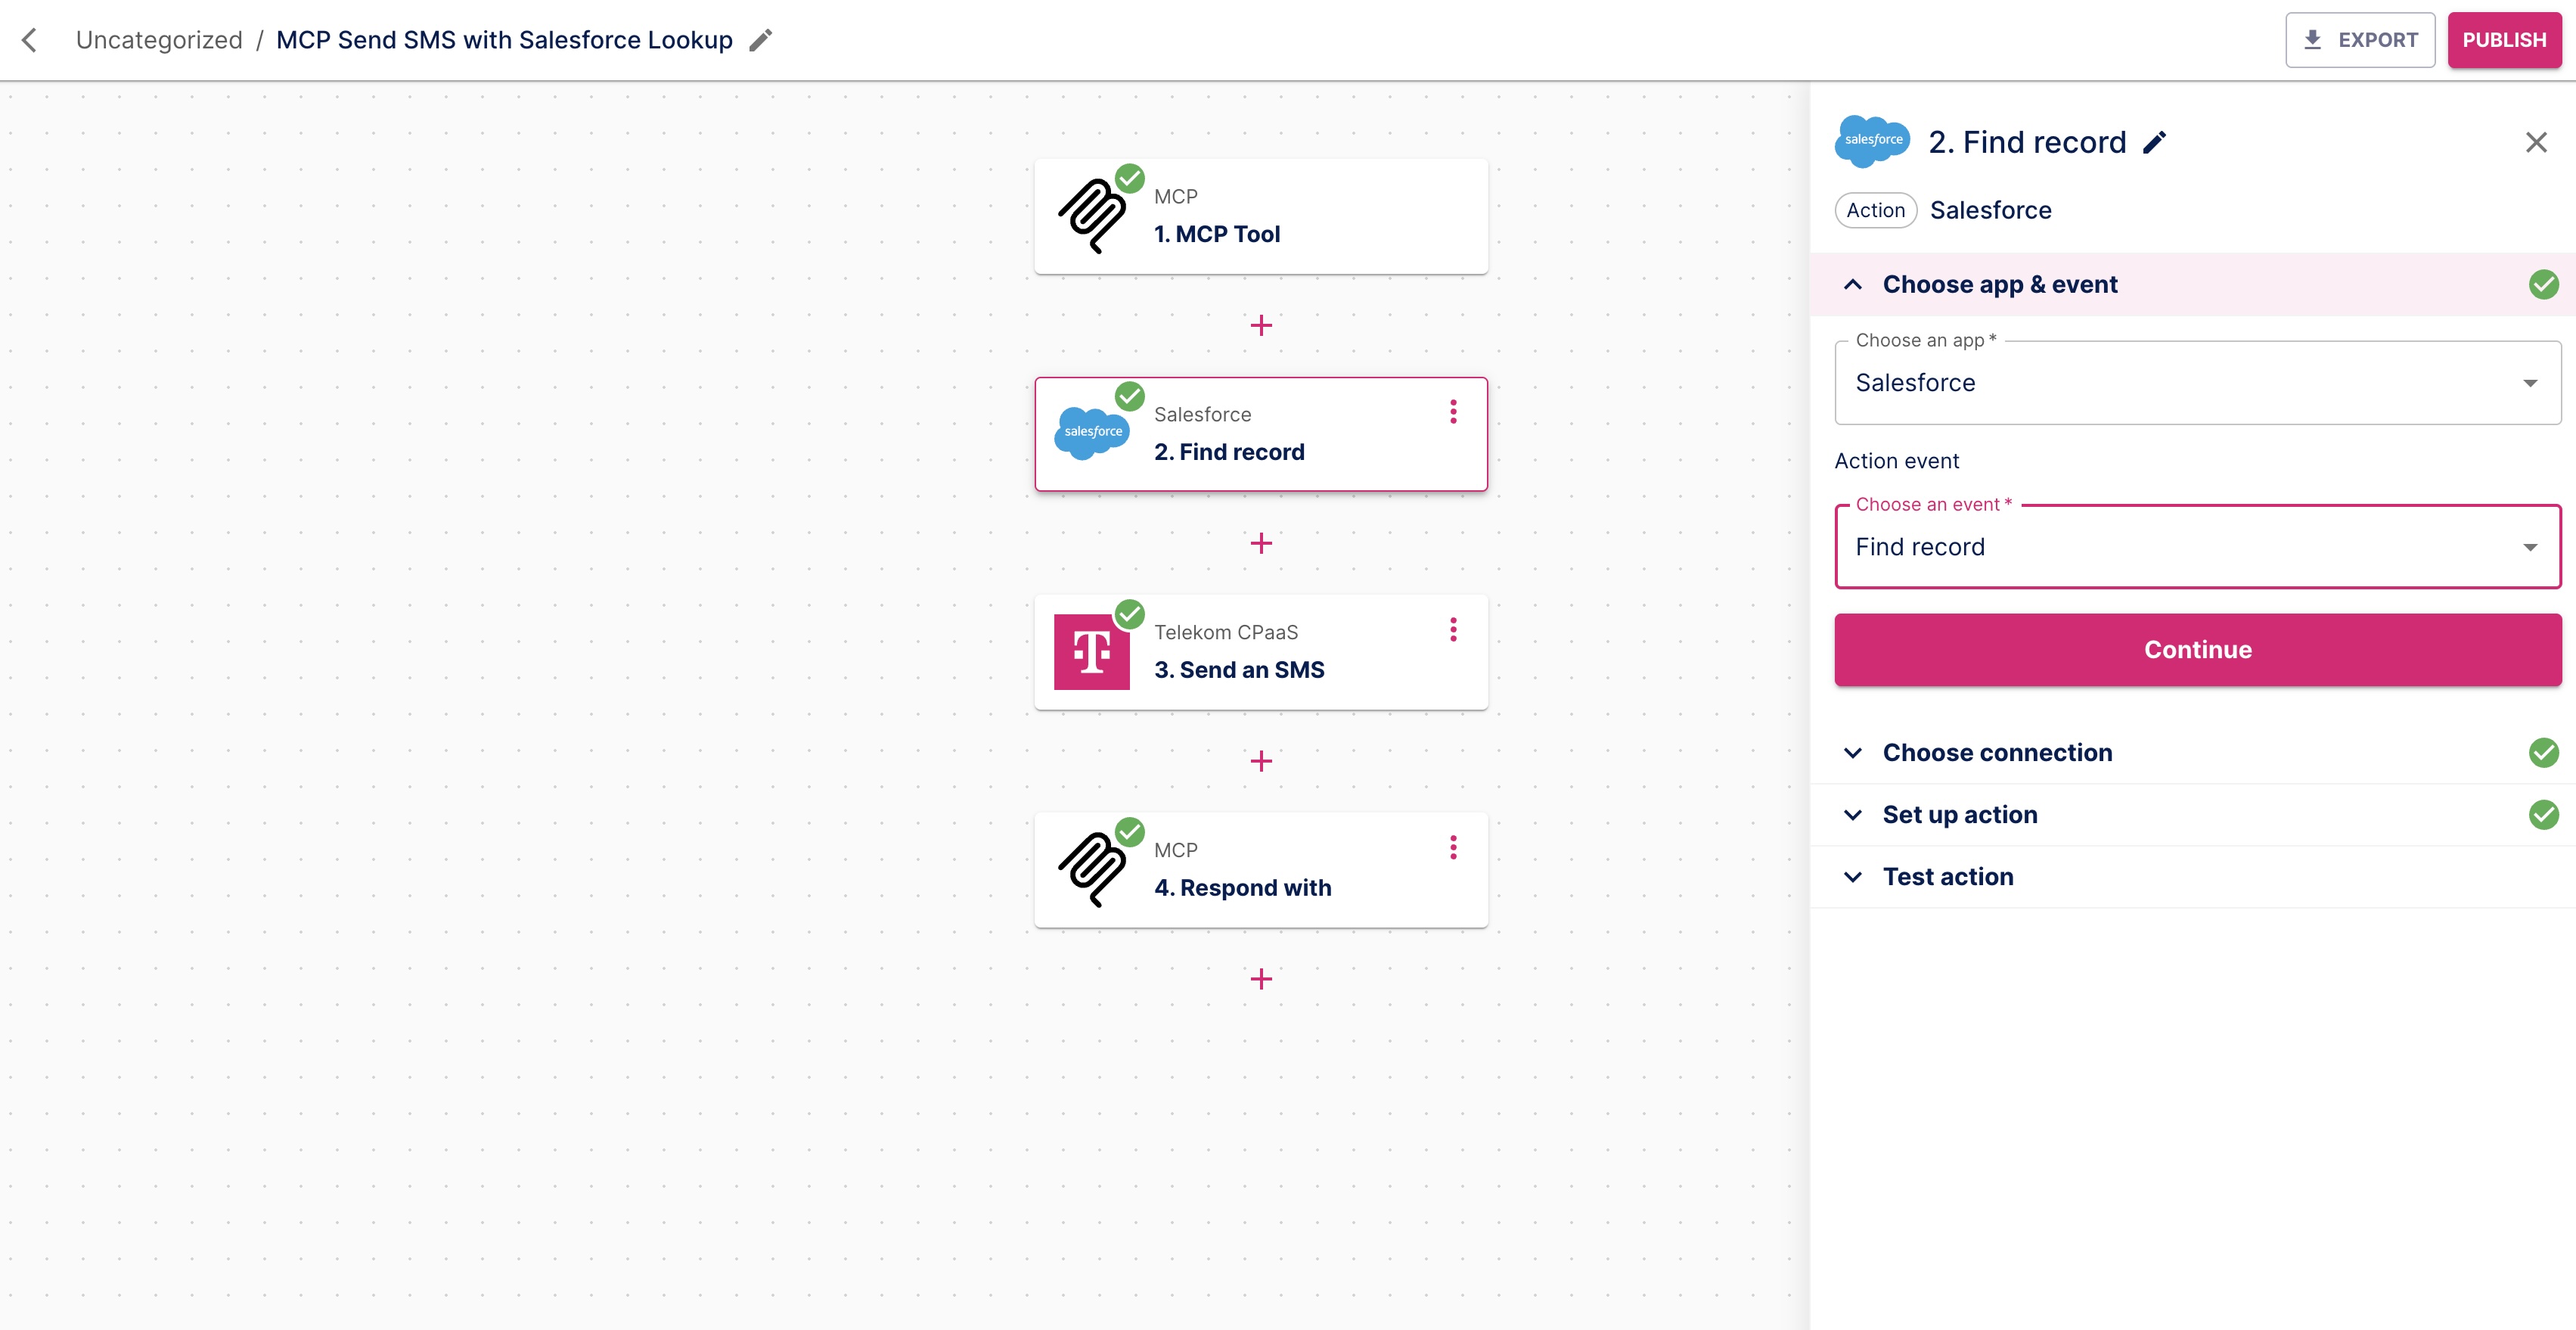
Configure the Salesforce action:
- Object: Contact
- Field: Business Phone
- Search Value: Choose the To number (from the MCP Tool)
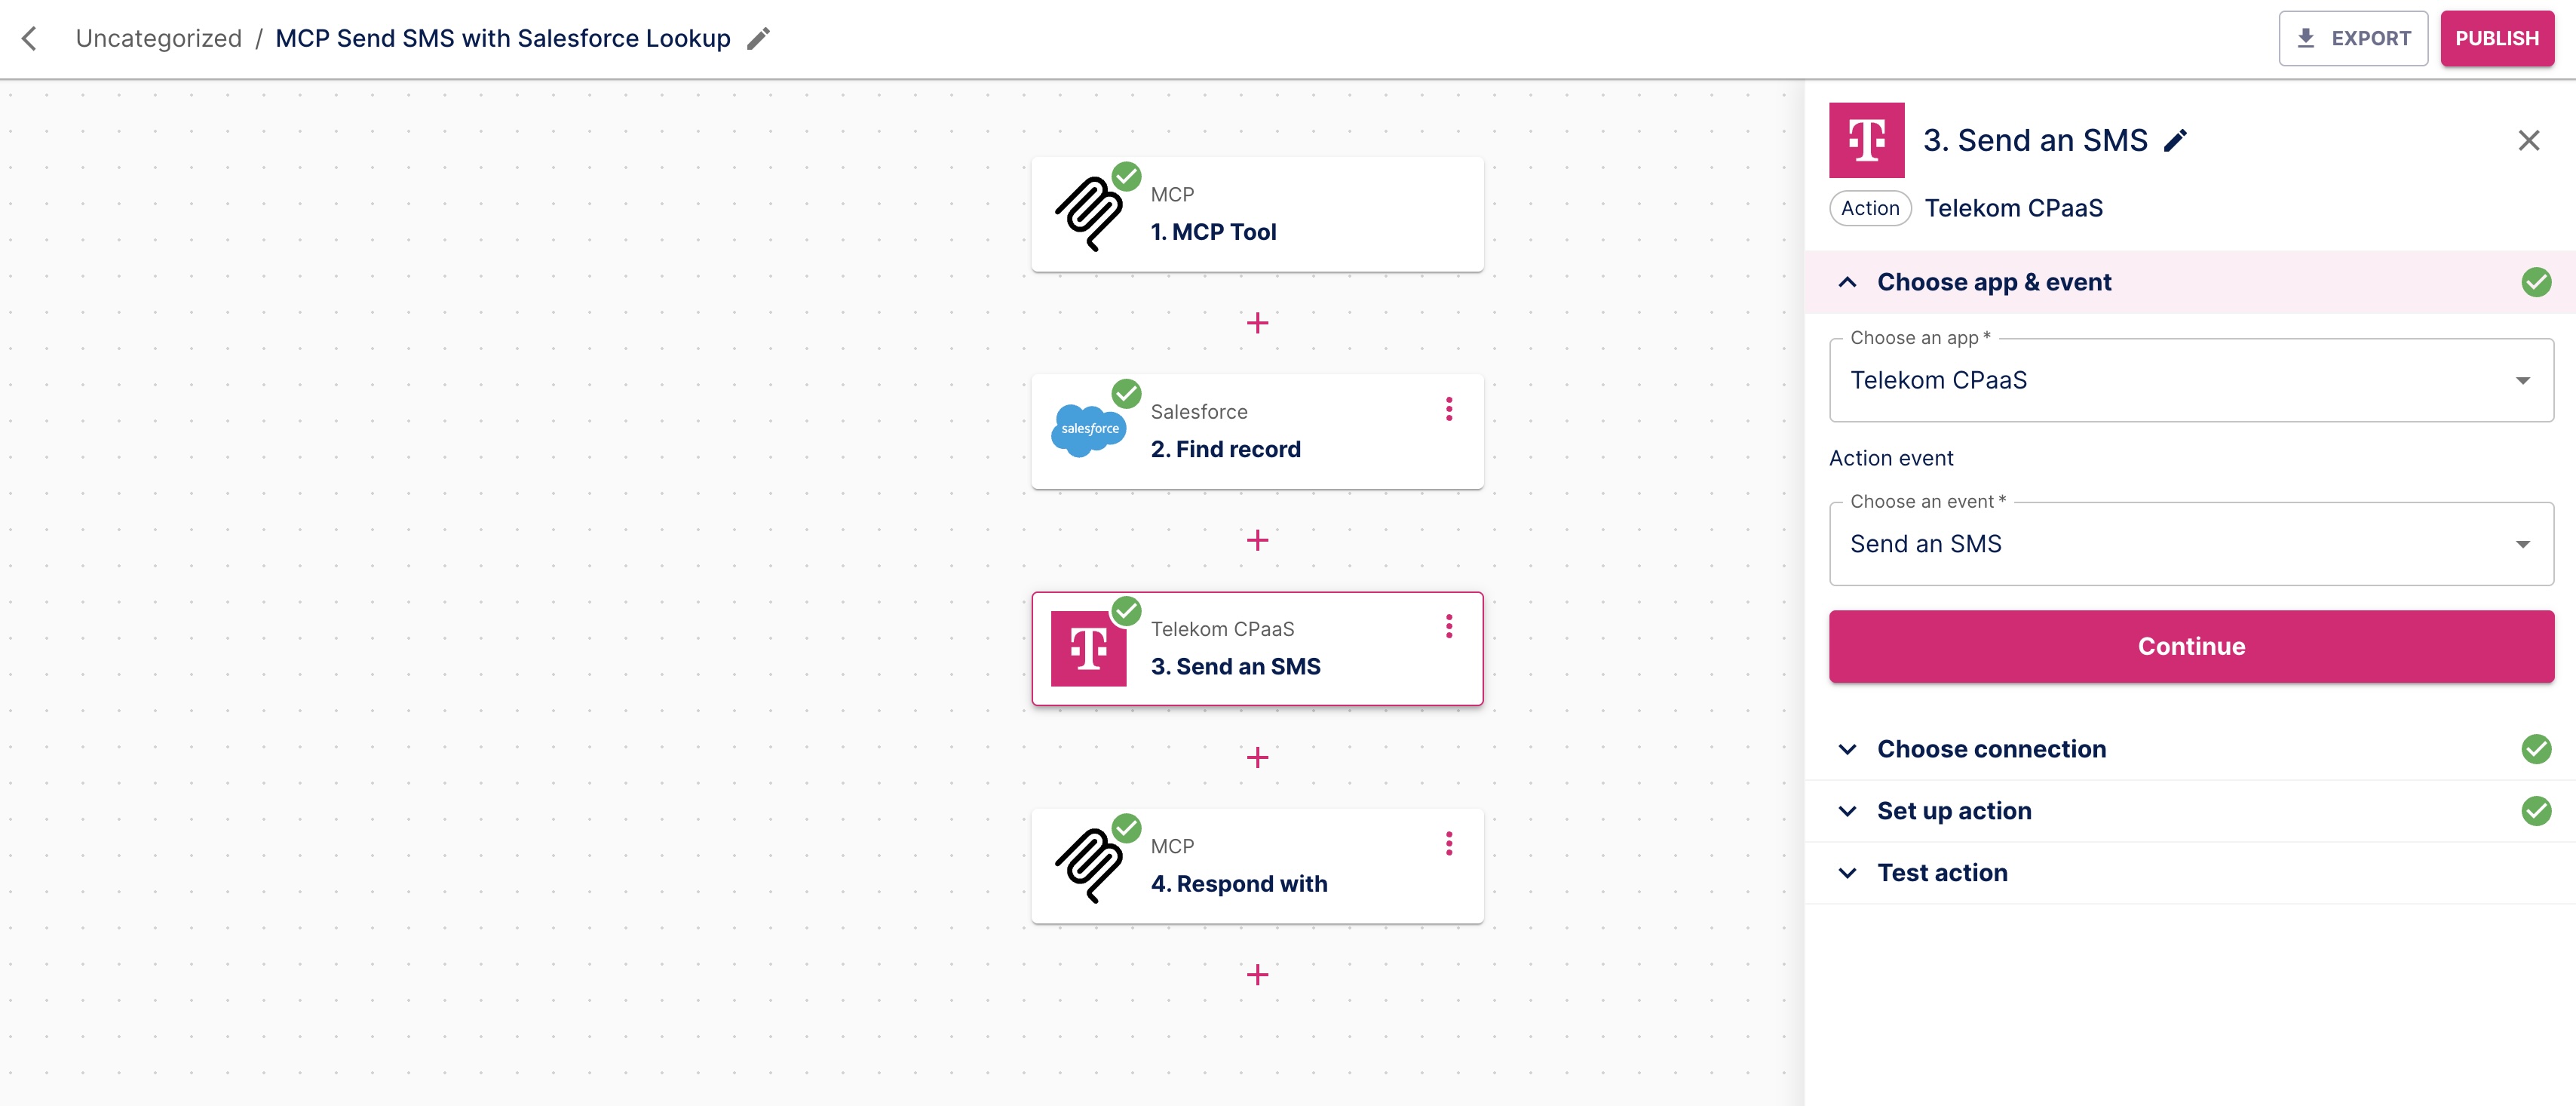
Step 3: Add the SMS Action
Add another step: Select Telekom CPaaS as the app and Send an SMS as the event. Click Continue. Choose an existing Connection for the app and Continue.
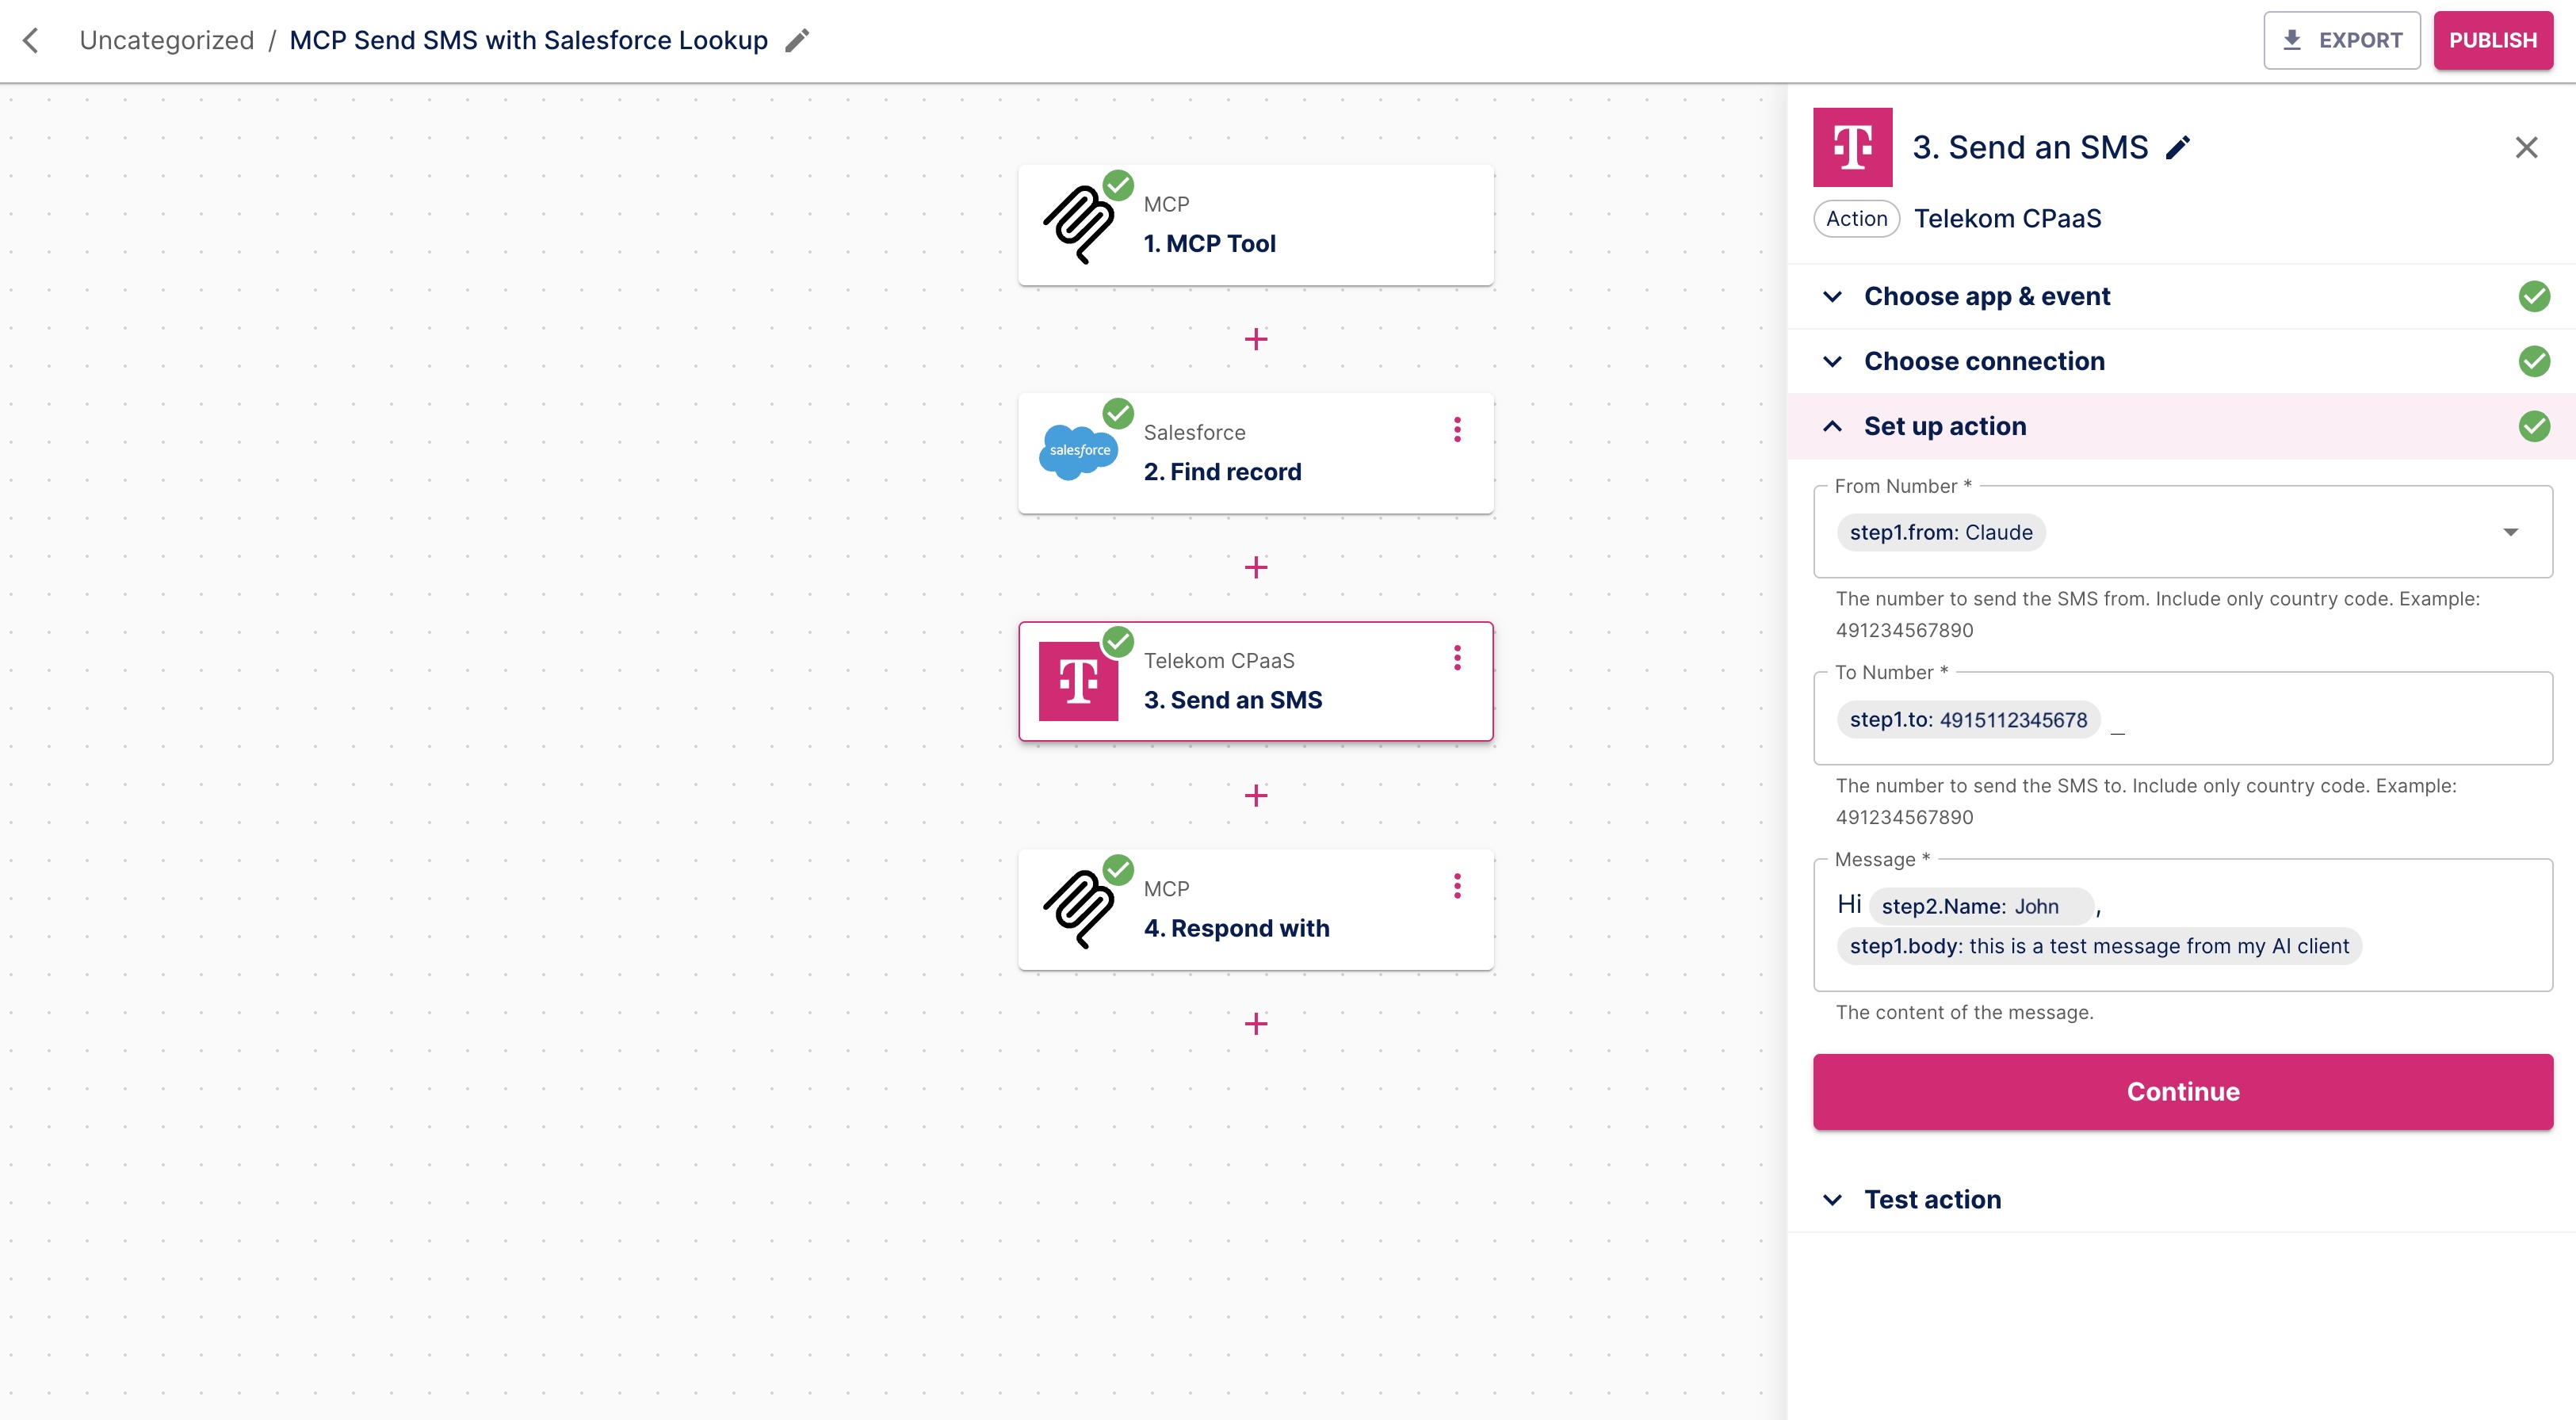
Configure the SMS action with dynamic values:
- From Number: Set Custom - MCP Tool - From Claude (AI Chat Client in this example)
- To Number: Set Custom - MCP Tool - To number
- Message: Construct Message from free text and dynamic values: Hi 'Find record - name', 'MCP Tool - Body'.
This personalizes the message with the contact's name from the Salesforce number lookup and the message defined in the AI chat client's prompt.
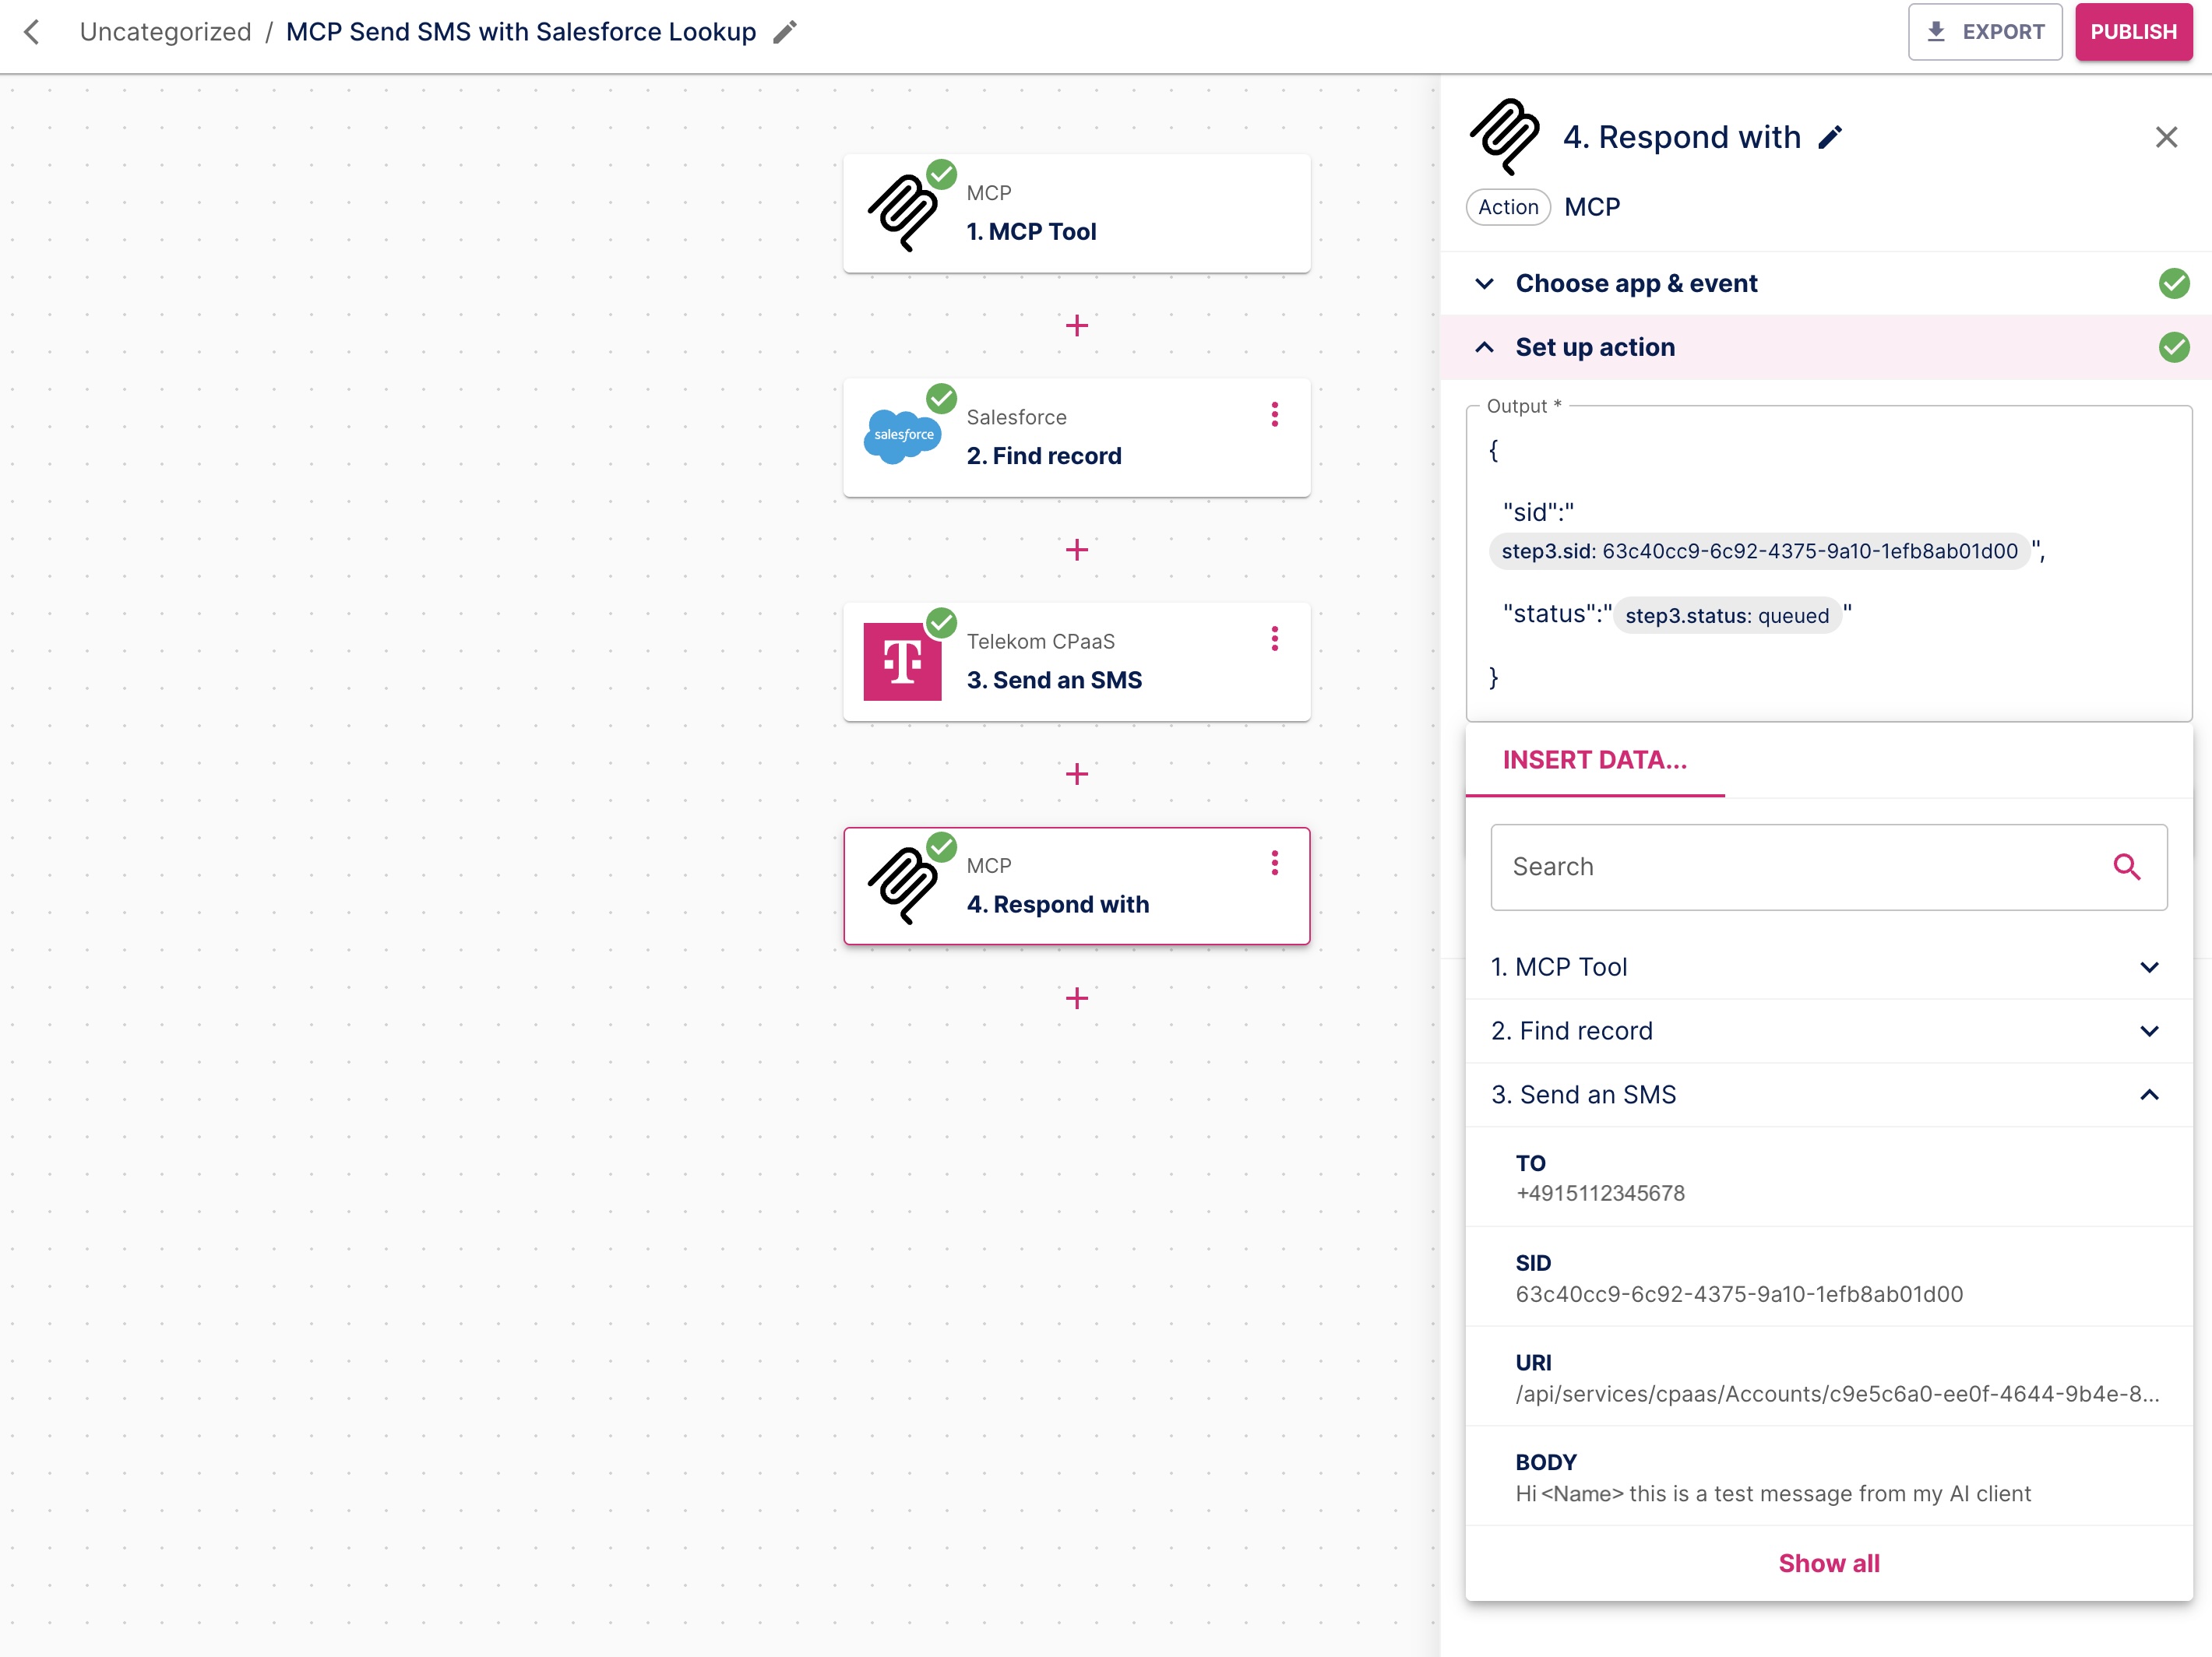
Step 4: Add MCP Response
Add a final Action step: Select MCP and Respond with as App and Action event. Click Continue, and define the Action's Output field with the dynamic fields you want the AI chat client to show as a response (in the example, it is SID and Status from the CPaaS Send an SMS data structure).
Click Continue, Test & Continue and Publish. The flow is prepared and can be exposed via MCP.
Step 5: Expose as MCP Server in AI chat client (example: Claude)
- Go to MCP Servers, choose the one you used in the above flow, and copy the Server URL from the Connect section.
 12. Navigate to Claude's Settings, choose Connectors, and Add custom connector. Name the custom connector, and paste the Server URL to the field in the Claude settings.
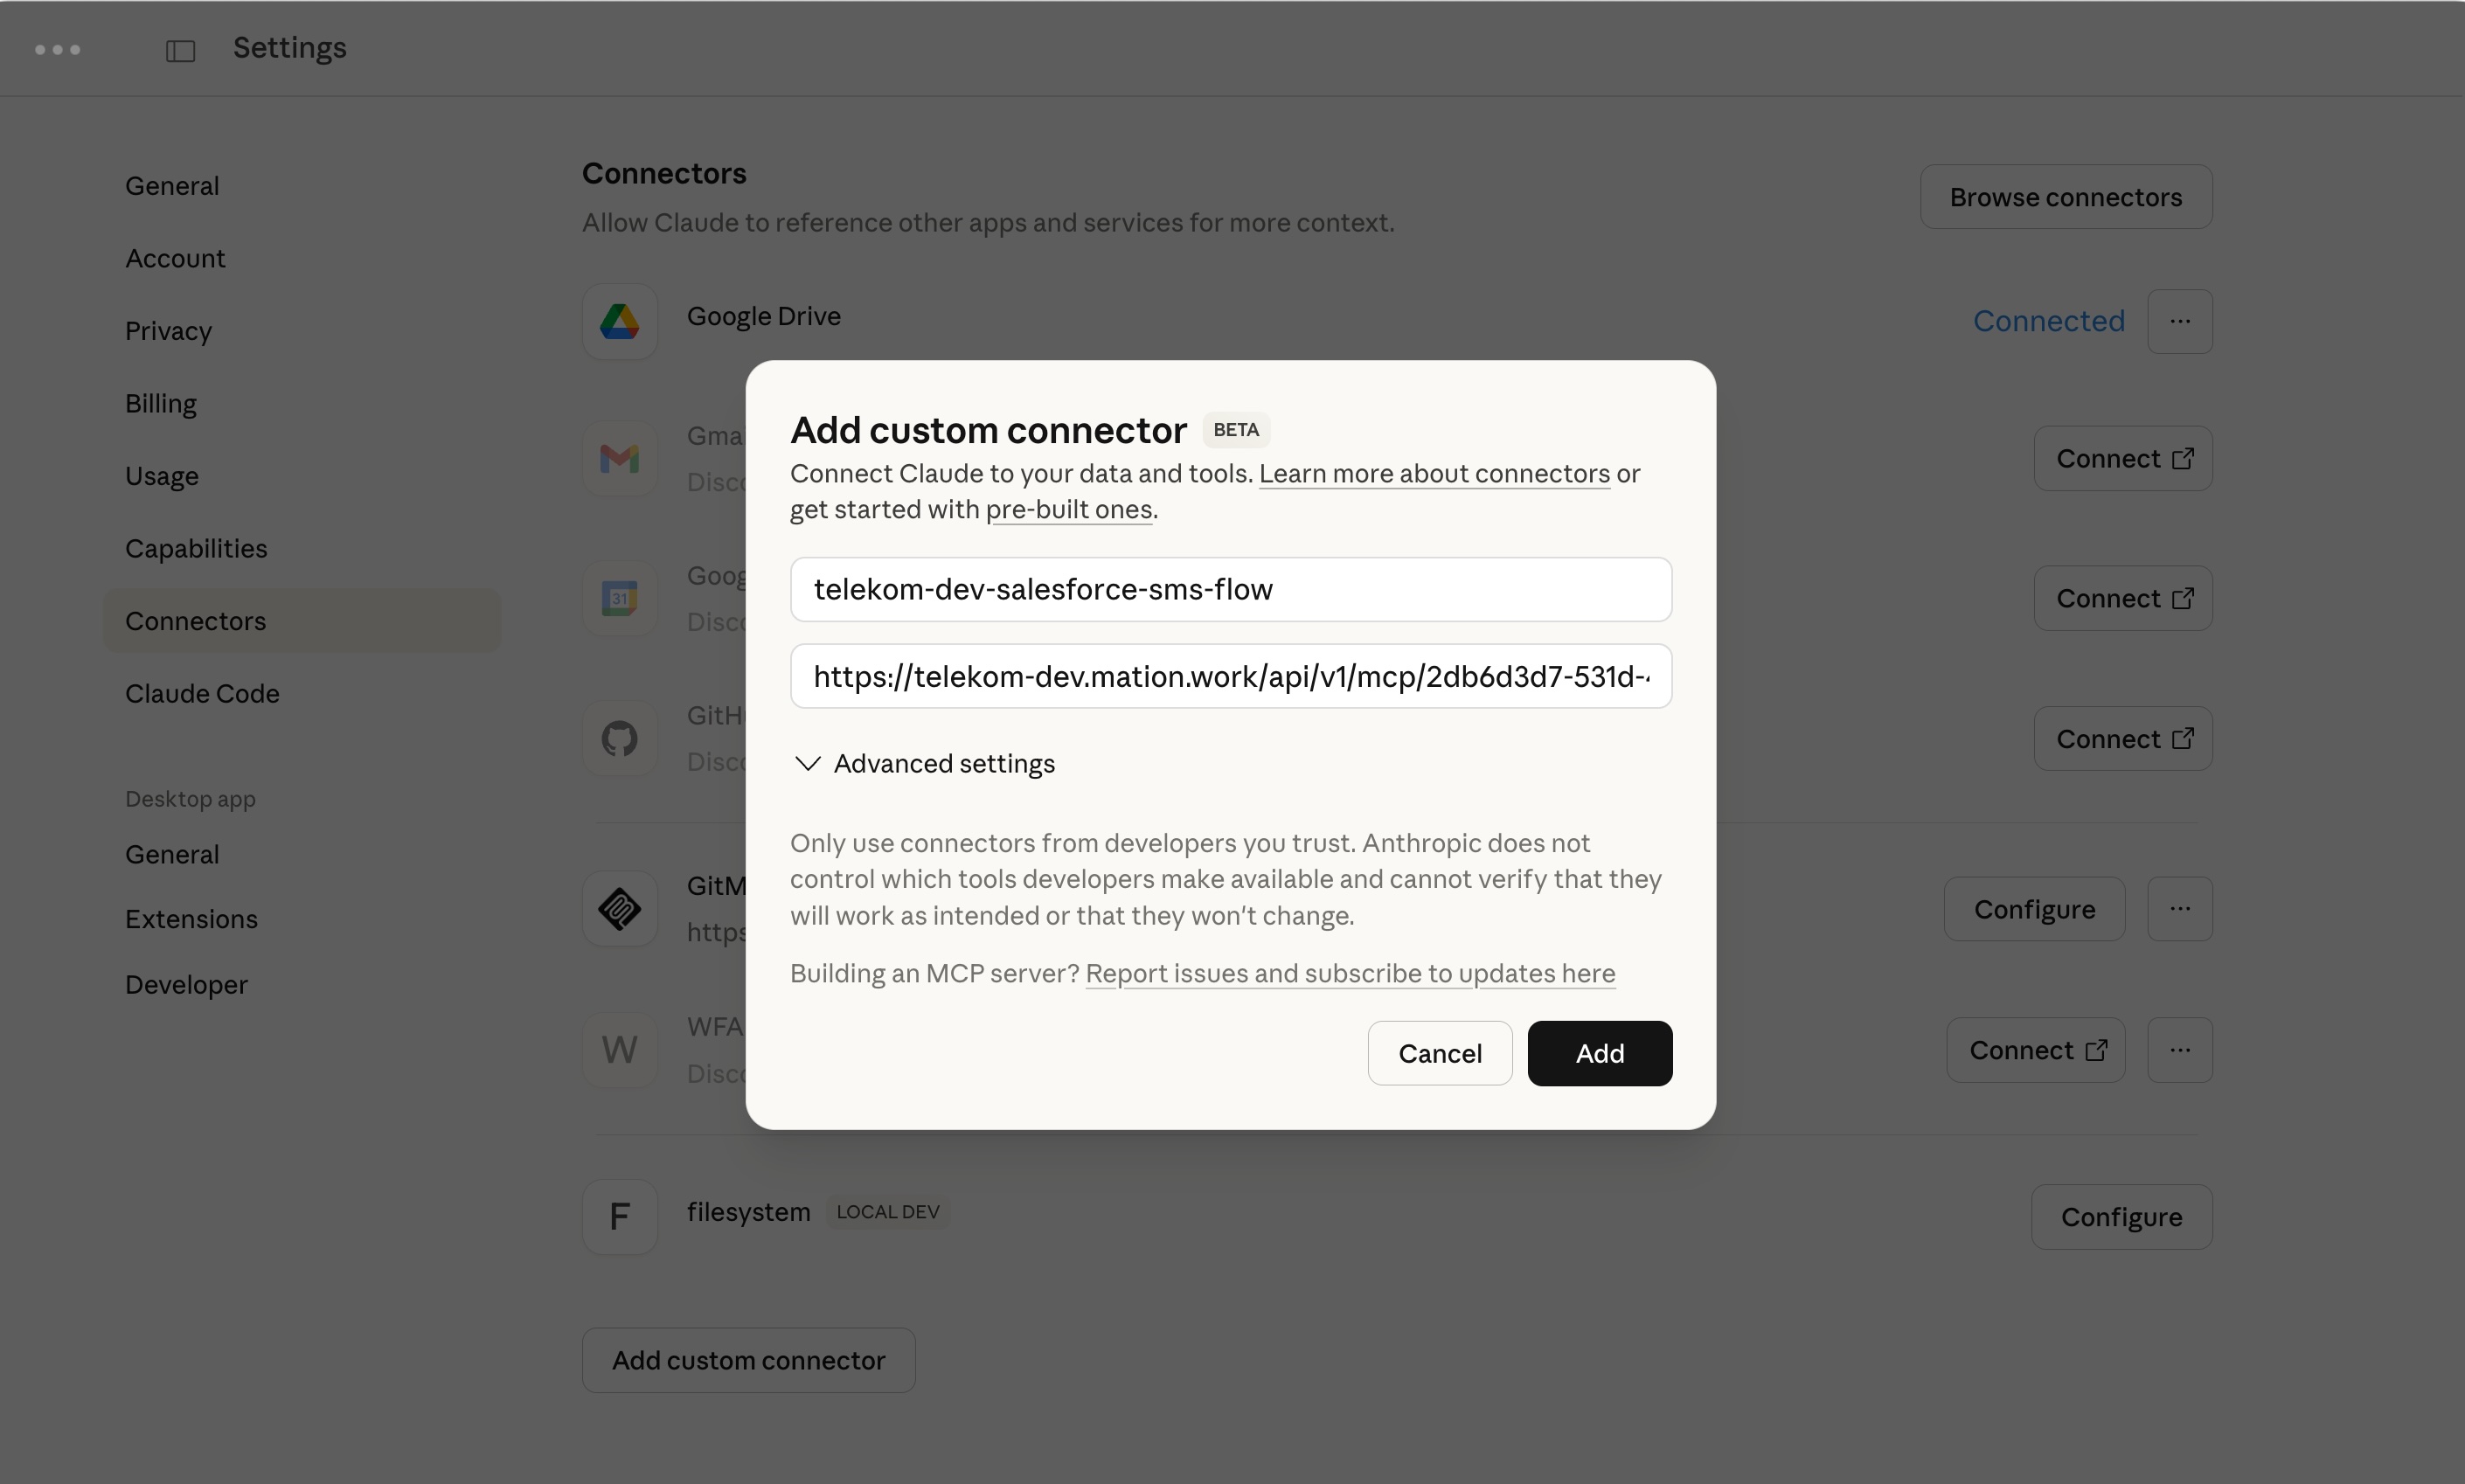
Go to the AI Chat window. Click + go to Connectors and activate your custom connector.
Write a prompt that suits your flow scenario. Be explicit, use natural language. Once the AI recognized that the prompt requires calling a configured tool, it asks for Allowance. Allow the usage of the tool.
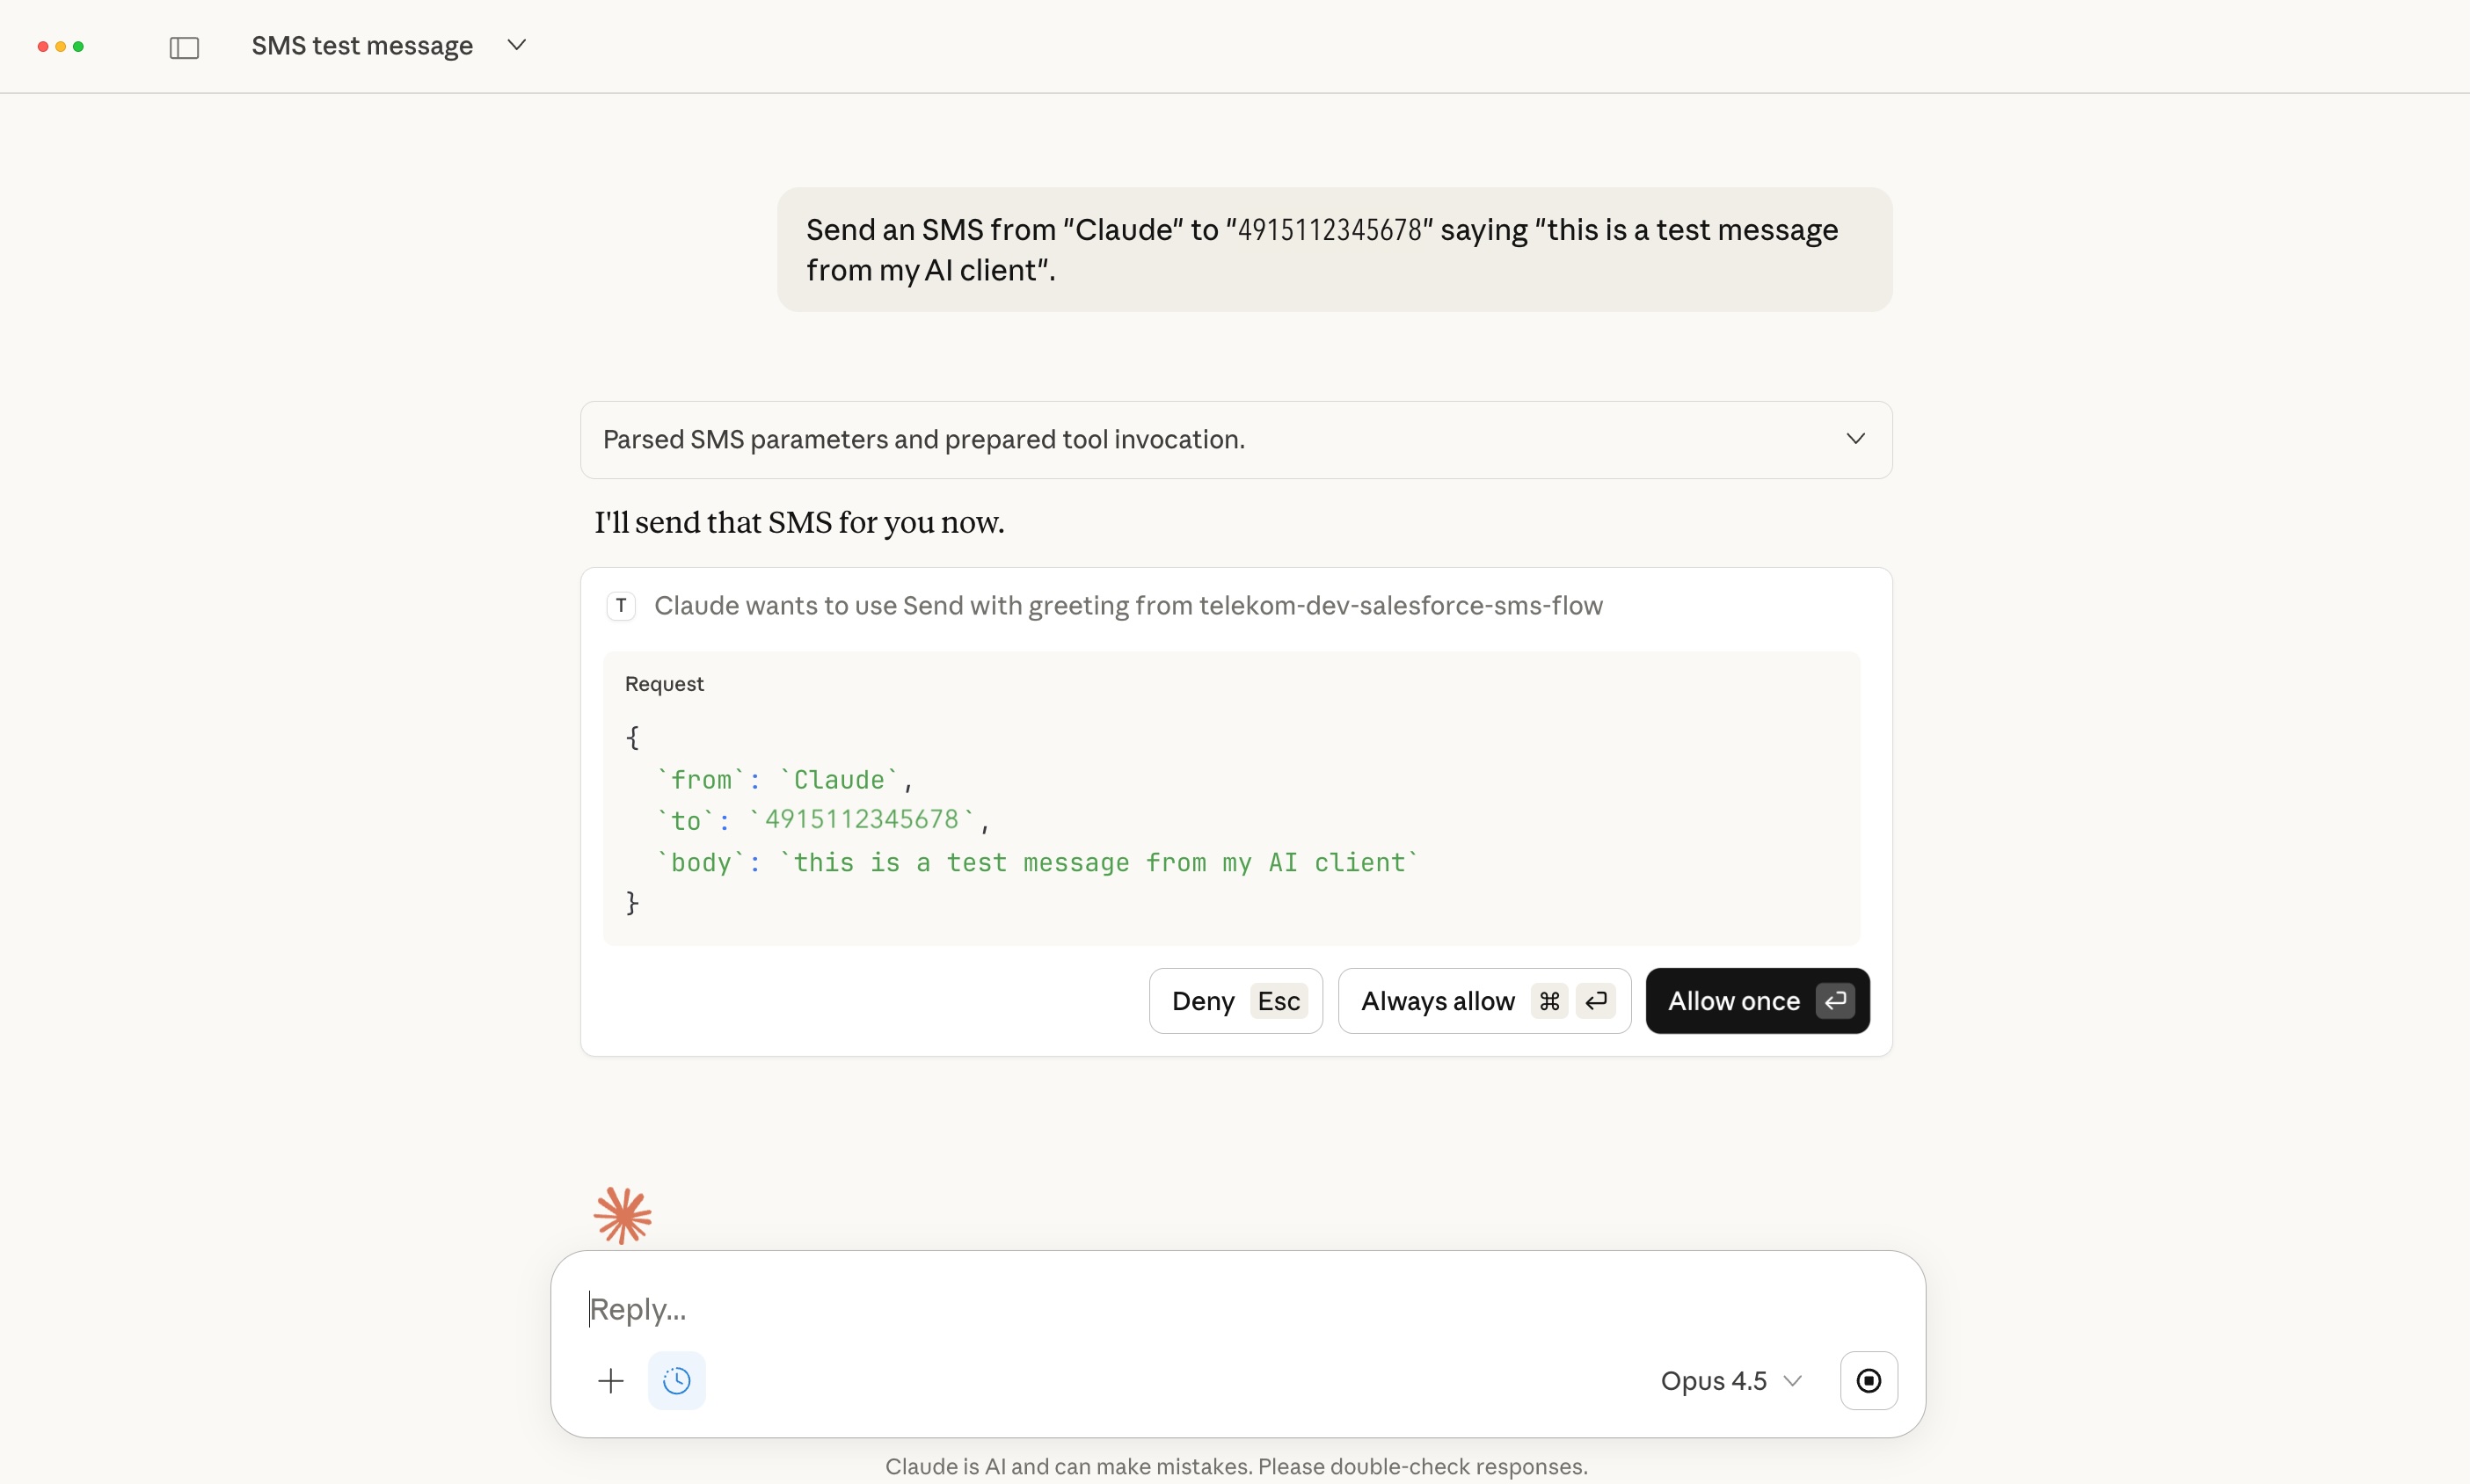
The AI chat client will call the tool and execute the pre-configured Workflow Automation flow via MCP, using the injected data from the prompt, and deliver the personalized SMS with the name from the Salesforce lookup in case the number from the prompt exists and has a name. The AI chat UI will show the provided response data from the flow (Status and SID).
INFO
You have successfully set up a flow with an MCP trigger, receiving data from an AI chat client, and injecting it into the flow, executing the flow, and responding with the result and pre-defined data from the flow in the AI chat client. From here, use your imagination to see what you can do with automation and AI!
Best Practices
Tool Naming
Give your MCP tools clear, descriptive names. The AI uses these names to understand when to call each tool.
Tool Descriptions
Write detailed descriptions for your MCP tools. Include:
- What the tool does
- What apps/services it uses
- What inputs are required
- What output to expect
Security
Each MCP server URL contains a unique token. Keep this URL confidential and only share with authorized AI clients.
Testing
Always test your MCP tools with simple queries before deploying for regular use. This ensures the AI understands how to use them correctly.
Troubleshooting
AI Can't Find My Tool
Problem: The AI assistant doesn't recognize or can't call your MCP tool.
Solution:
- Verify the MCP connector is enabled in your chat session
- Check that the MCP server is published and the URL is correct
- Ensure the tool has a clear name and description
Tool Calls Fail
Problem: The AI calls the tool but gets errors.
Solution:
- Check that all required connections in your flow are active
- Verify the input schema matches what your flow expects
- Review the execution logs in Workflow Automation for specific errors
Missing Data in Response
Problem: The AI doesn't receive the expected data back.
Solution:
- Ensure you have an MCP Respond step at the end of your flow
- Configure the response to include all relevant output data
- Check that the previous steps are successfully returning data